|
|
 |
|
|
|
| Author |
Messages |
Collin
Unregistered

|
      
 Posted Friday, May 9, 2008 @ 08:39 PM Posted Friday, May 9, 2008 @ 08:39 PM
Hi,
Here is a link to Bob's acro fuel cap
http://www.fournieruk.com/technical/Bobs_mods/Bobs_mods_text.html
|
Sam M.
Unregistered
|
Posted Saturday, May 10, 2008 @ 01:09 AM
we are needing a whole new fuel cap/float. is there anyplace we can buy that?
sam
|
Bob Grimstead
Unregistered
|
Posted Saturday, May 24, 2008 @ 01:11 PM
Hi Tim,
Sportavia used to supply these caps, but I got both of mine made locally. The guys turned up the cap itself copying the threads used on the original cap with the float, then threaded the inside of the cap to accept the needle valve from a Stromberg CD150 carburettor (simply because I had a couple of these).
The outside is drilled and tapped to accept a short (two-inch?) stainless steel vertical rod, itself drilled up the middle, but with the top left closed. That rod is threaded to match, and fitted with a lock nut, so you can turn it to face the airflow when your cap is scrrewed down against the O-ring, then a few holes are drilled in the forward face of the rod (more than one hole so you don't block it with a single bug).
For a photo, see Bob's Mods on the CFIAmerica site.
Click on Fournier RF4s on the left margin, then Bob Grimstead's #4093, then Bob's mods.
Yours, Bob
|
Bob Grimstead
Unregistered
|
Posted Friday, December 26, 2008 @ 11:06 AM
Hi Tim,
Sorry for the slow reply, I hadn't seen your post.
I have had two of these made for me, both slightly different.
The fuel tank cap thread is apparently a standard thread that can be turned up by most folk with a lathe.
Take your current tank cap for them to see.
Best made out of aluminium, for lightness.
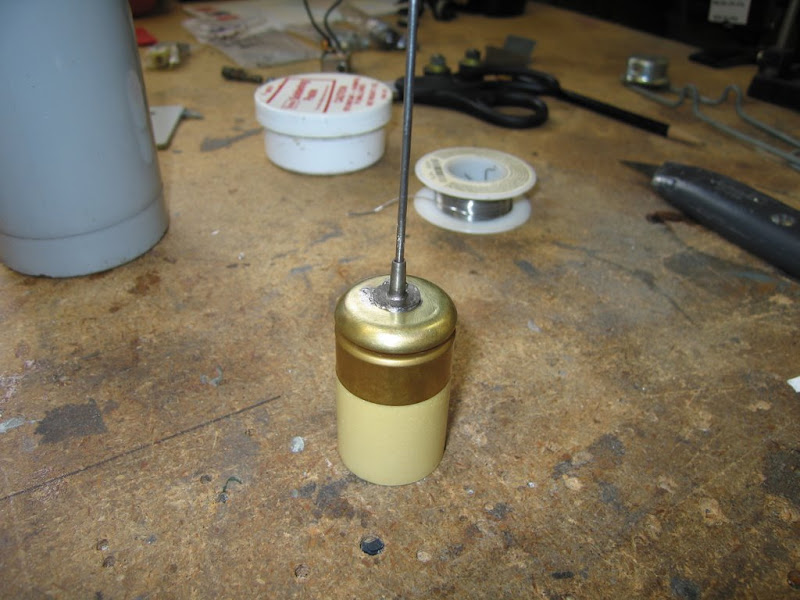
Into the centre I've fitted the needle valve from a Stromberg CD 150 carburettor. I used that because I happened to have a couple, but they are slightly more sophsticated than the average needle valve, with a couple of ball bearings of different sizes, completely enclosed in the brass fitting -- see the above photo.
That's threaded into an appropriately threaded hole tapped in the underside centre of the cap.
Use a small O-ring to seal it.
Into the top of the cap, with any thread you like goes a stainless steel bolt, with its head cut off.
I think mine were 1/4 inch BSF, but any appropriate-looking size should do.
Drill a hole from the threaded end into the bolt's shank all the way up to the top (1/8th inch I think -- whatever looks good), and then three or four holes (1/16th inch?) into the side of the bolt for the air to pressurise the tank.
Fit a locking nut, so you can turn the little holes to face forward however compressed your tank cap's O-ring becomes.
It's not hard.
It dribbles a tiny bit under -0.1g, but any more than that and it stops all flow.
Also sprays a bit if the tank's full and you taxi over bumpy ground, so don't open the canopy or you'll have an Avgas after-shave.
Good luck.
Yours, Bob
|
dannparks
Unregistered
|
Posted Sunday, September 13, 2009 @ 06:34 PM
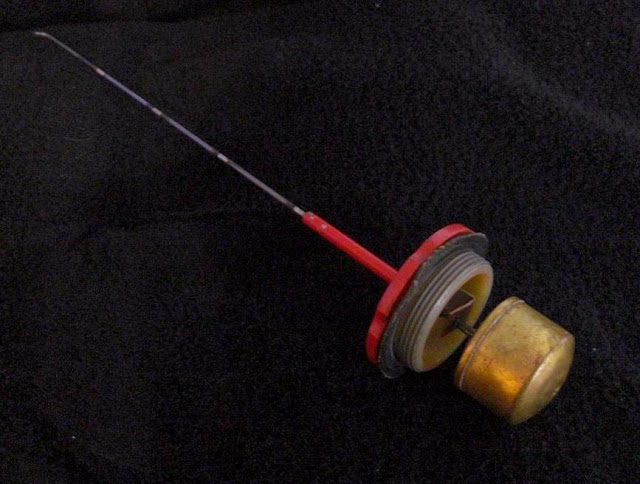
Hows this for a simple float fix? De-solder the old brass float and re-solder the wire to the top of a new one. This float is from Aircraft Spruce (P/N 10-02079) and is similar to the Ford float that Collin found. If you still have your old wire, this seems to be an easy fix. This has a plastic/foam float that cannot get saturated or leak. I don't know how hot it melts. I used a butane torch very lightly to melt the solder, after cleaning and tinning both surfaces.
It is a little taller than the original, so you can cut off or unbend the old wire to get it out and and clean out the fitting (if it is rusted out like mine) and have enough extra wire for a new bend. I don't know how it will float in the fuel. It might touch bottom earlier than the original float.
--------------------
|
Bob Grimstead
Unregistered
|
Posted Monday, September 14, 2009 @ 05:52 AM
Hi Folks,
Here's a fuel float tip for everybody.
All RF4 floats tend to stick at the full mark, even when the tank is nearly empty and you checked it went up and down freely immediately before you closed your canopy. This problem is not so great if you take off with less than a full tank.
I've realised that the reason they stick is not due to any friction between the wire and its guide in the cap, but simply due to the high bending force imparted to the wire by the combined airflow and propwash.
An answer that works for me is to fit a tiny brass spring from a ball-point pen around the wire below the cap and above the float. This weighs nothing so it does not affect your fuel gauge reading, but it does help to push the float down from the cap. If your gauge is already assembled, you simply wind the spring around the wire until it's in place.
Then, if you are in flight, with this spring fitted, and you have been flying for some time but the wire isn't descending properly, merely close your throttle and slow down until you stall. The reduced airflow will allow the wire to straighten, and the spring will ping the float back down to its correct position.
If the idea of stalling frightens you, then you are definitely not practicing your stalling enough. Go and make a few stalls with an instructor in an RF5 or similar airplane, and then stall your own airplane regularly, and you'll find the fear goes away.
Yours, Bob
[Edit by Bob Grimstead on Saturday, April 3, 2010 @ 08:33 PM]
|
Jorgen
Unregistered
|
Posted Wednesday, November 25, 2009 @ 10:02 AM
...and when the fear goes away, practice can take over....
Actually good point Bob, the RF 4 is so much of a thoroughbred that you almost HAVE to practice stalls and maybe do some aeros (as always after instruction) to be able to fly it confortably- and enjoy flying it even more.
MAy the 4�s be with you/ J�rgen
|
jb92563
Unregistered
|
Posted Friday, January 15, 2010 @ 01:55 PM
After having to straighten my float wire uncountable times already and it getting a little too kinky,
I finally have come up with the brilliant idea of using "Piano Wire" instead.
It is very stiff and springy and will flex rather than kink.
You can also solder it very easily as it has nickel or cadmium in its alloy I believe.
It is common in the US as any hobby shop will carry it in a multitude of diameters.
The next question is how can I put markers on it so it does not rub off in the guide tube?
I was thinking just sanding the bands where I want the tank level marks
so it would not be shiny in those areas.
Any ideas or comments on that?
--------------------
|
Jorgen
Unregistered
|
Posted Friday, January 15, 2010 @ 06:16 PM
Uuum,
no offence Ray, bit I don't think I've seen any marks on any float wire, not on Fourmiers, nor on Piper Cubs. I see your point, but on the other hand if you start calculating fuel/airtime left based on floatwire readings you might develop a habit that could lead to trouble. I prefer to use the clock, to me the float wire is more like a visual reminder of the limits of the fuel supply and as you have proven with the wire kinkin', it is unfortunately not totally fool proof- it can get stuck. And maybe it can get stuck even easier if you sand bands in it.
I agree that a non-kinking piano wire is a good idea, but I haven't tried soldering.
May the 4's be with you/ J�rgen
[Edit by Jorgen on Friday, January 15, 2010 @ 06:18 PM]
|
Bob Grimstead
Unregistered
|
Posted Saturday, January 16, 2010 @ 09:04 AM
Hi Guys,
Yes, I have filed marks on all my fuel float wires (both Fourniers and the Champ -- I did it on my old Fly Baby, too).
Simply lift the tailwheel on to a jerry can and put both outriggers on to something to keep it wings-level and ensure you are in the 'omygod I don't have much fuel left so I'm throttled back and flying slowly' attitude, and put five litres of fuel into the tank (get it from the gas station in a five-litre can to be precise).
Then grab the wire where it comes out of the cap and bend it over at right-angles.
That's your 'when this kink starts tapping on the fuel cap I MUST LAND because I only have half an hour of fuel' mark.
When Bellanca built my Champ, they also painted this red.
Then put another five litres in to make ten litres and file a little groove all round the wire where it comes out of the cap.
Ditto for 15, 20, 25 and 30 litres. Full should be 36 litres.
Since the 1400 VW burns about 10 litres per hour at cruise, this gives you time left as well as fuel left.
We also made calibrated wooden dip-sticks at the same time.
Incidentally both these things are not only the law in Australia, but you must also by law re-calibrate your gauges and dipsticks every five (or is it three?) years
Like so many Austrlian laws, that's a good idea, but I reckon it's a bit anally-compulsive to make it a law!
My Champ and the Fly Baby have tiny, thin brass tubes for the gauges, rather than wire. By picking the right diameter of tube (from your local hobby/model shop) you can ensure the rod is a tight but movable fit in the cap, minimising the chance of it getting cocked over to one side by the airflow and jammed, and also minimising the amount of fuel you lose when you turn upside-down (or hit a big bump, either in the air or on the ground). Brass tubing is easy to solder too, of course, and lighter than wire of the same diameter.
Yes, I'm anally-compulsive about weight
Yours, Bob
|
jb92563
Unregistered
|
Posted Friday, January 29, 2010 @ 09:44 PM
In thinking about the issue of marking the float wire with something that will not rub off,
I came upon another idea.
I will sand bands onto the wire and then use Gun Bluing to apply a black band that will not easily rub off like paint.
It should withstand the rubbing and vibration for a considerable time and is deposited in a very thin layer 0.005" so will not cause the wire to stick in the guide tube.
It will also withstand fuel and alcohol.
[Edit by jb92563 on Saturday, January 30, 2010 @ 01:09 AM]
--------------------
|
jb92563
Unregistered
|
Posted Saturday, February 20, 2010 @ 08:52 PM
I replaced my kinked float guage wire which looks like it was 2mm brass.
I used 3/32" music wire that the local hobby shop carried.
I believe the wire is a spring steel alloyed with some nickel and cadmium, so it is solderable and should not corrode.
The music wire is very springy and takes considerable force to bend or kink.
My float wire will never be bent again by an errant elbow or a canopy cover..
I also solved the wire marking problem (Paint rubs off quickly) by using solder to "tin" bands on the wire at 1/4 tank intervals.
I first masked the bands with painters tape, then used a dremel to rough up the bands slightly then soldered those areas and wiped off the excess solder.
I then heated the remaining thin layer of solder 1 last time to smooth it.
Upon measuring with the calipers I had deposited a layer of solder 1/500" thick so no worries on catching anything.
I think a little jewelers rouge on a buffing wheel and I will have very shiny makings.
The picture is before polishing the markings.
--------------------
|
Bob Grimstead
Unregistered
|
Posted Saturday, April 3, 2010 @ 08:37 PM
Hi Folks,
Here, at last, is a photo of my fuel gauge float spring mod.
The springs come from ball-point pens; I think they're brass, but they may be plated.
It is easy to wrap the spring around the gauge wire, and it sure does help prevent that sticking.

Yours, Bob
|
|
|
|
|
|
|
|
|
|
|
|
|
| Login |
|
|
In order to fully utilize the abilities of this board, you are required to register as a member. Registration is free, and allows you to do lots of things including turning on or off certain features of this board. Register now! |
| Forum Rules & Description |
Who Can Read The Forum? Any registered user or guest
Who Can Post New Topics? Any administrator or moderator
Who Can Post Replies? Any administrator or moderator
Who Can Edit Posts? Any original author
|
Tips for maintaining Fournier Motor gliders |
| Currently Active Users: 705 |
There are currently 0 members and 705 guests on the boards. | Most users ever online was 42535 on 04-07-2026 02:43 AM
|
| Search This Forum |
|
|
|
|
Powered by CuteCast v2.0 BETA 2
Copyright © 2001-2003 ArtsCore Studios
|
|