| Author |
Messages |
Bob Grimstead
Captain


Gender: Male
Location: Perth, Western Australia or West Sussex, England
Registered: Dec 2006
Status: Offline
Posts: 2029
|
      
 Posted Saturday, October 27, 2007 @ 01:54 AM Posted Saturday, October 27, 2007 @ 01:54 AM
Hi Folks,
By now most of you will have read about my wheel-up landing. If you have, just skip to the end and the photos.

For newcomers:
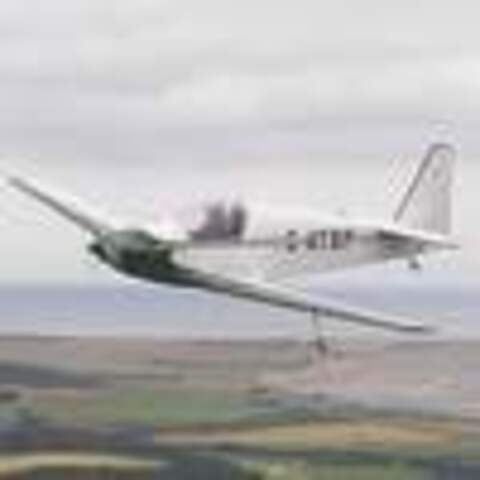
I was doing aerobatics while tired and jet-lagged, up against a deadline, overdid it, felt queasy, got low, decided to land, must have decided to leave the wheel until a little later because I was low, noticed the shallow glide on final and the need to sideslip (forward slip) but DIDN�T realize that was because I had no wheel drag. No horn when the throttle was closed and the airbrakes were out, so I relaxed. I even checked the little locking lever was in place � it was, but the wheel was locked up. Bang! No propeller.
It tuned out, of course, that a wire to the horn and light from the wheel and spoiler microswitches had snapped off. When I went to fix it, another did so in my hand. Right where they go into the test button. Then the other wires all snapped off!

I later discovered that other Fournier owners had been experiencing similar problems with their forty year-old wiring. I also learned the power source for the test button is quite separate from that through the spoiler, throttle and wheel microswitches, so all it tests is the bulb and the horn, not circuit continuity or the microswitches.
Now my lever is painted green on the side I can only see when it�s down, and red with yellow stripes on the side visible when it�s up. I don�t expect that to stop me from doing it again, though.


Good luck to you all.
Bob
[Edit by Bob Grimstead on Thursday, February 4, 2010 @ 02:35 AM]
[Edit by Bob Grimstead on Thursday, February 4, 2010 @ 02:37 AM]
|
Donald
Command Sergeant Major

Gender: Male
Location: Scotland
Registered: Jan 2007
Status: Offline
Posts: 489
|

Posted Monday, October 29, 2007 @ 07:27 AM
Bob, I sympathize. I've done that too, not after aeros, but after a long day, tired, low, flat approach due to weather, all my normal cues missing. It sure makes for a short landing.
|
Jorgen
Captain

Gender: Male
Location: Lund, Sweden
Registered: Apr 2007
Status: Offline
Posts: 835
|
Posted Monday, November 12, 2007 @ 03:20 PM
Hi,
we had a nice high pressure this weekend so I spent father�s day NOT unwrapping the umpty-eleventh tie but actually doing some 4-play.... And in doing so it suddenly dawned on me why I haven�t quite felt that anxiety of doing a wheels-up landing with XST. Sure, I know it�s an inherent risk in all aircraft with retractable gear- I�ve done a wheels-up myself with a LS-3 glider. You will probably not believe me, but that was actually not my fault, the gear sagged due to a faulty spring. I got proof- the gear doors were sanded down on the INSIDE, not the outside! But I felt just as silly, sitting there feeling rather low on the tarmac at the end of an extra, slightly curved, gelcoat-painted centreline.
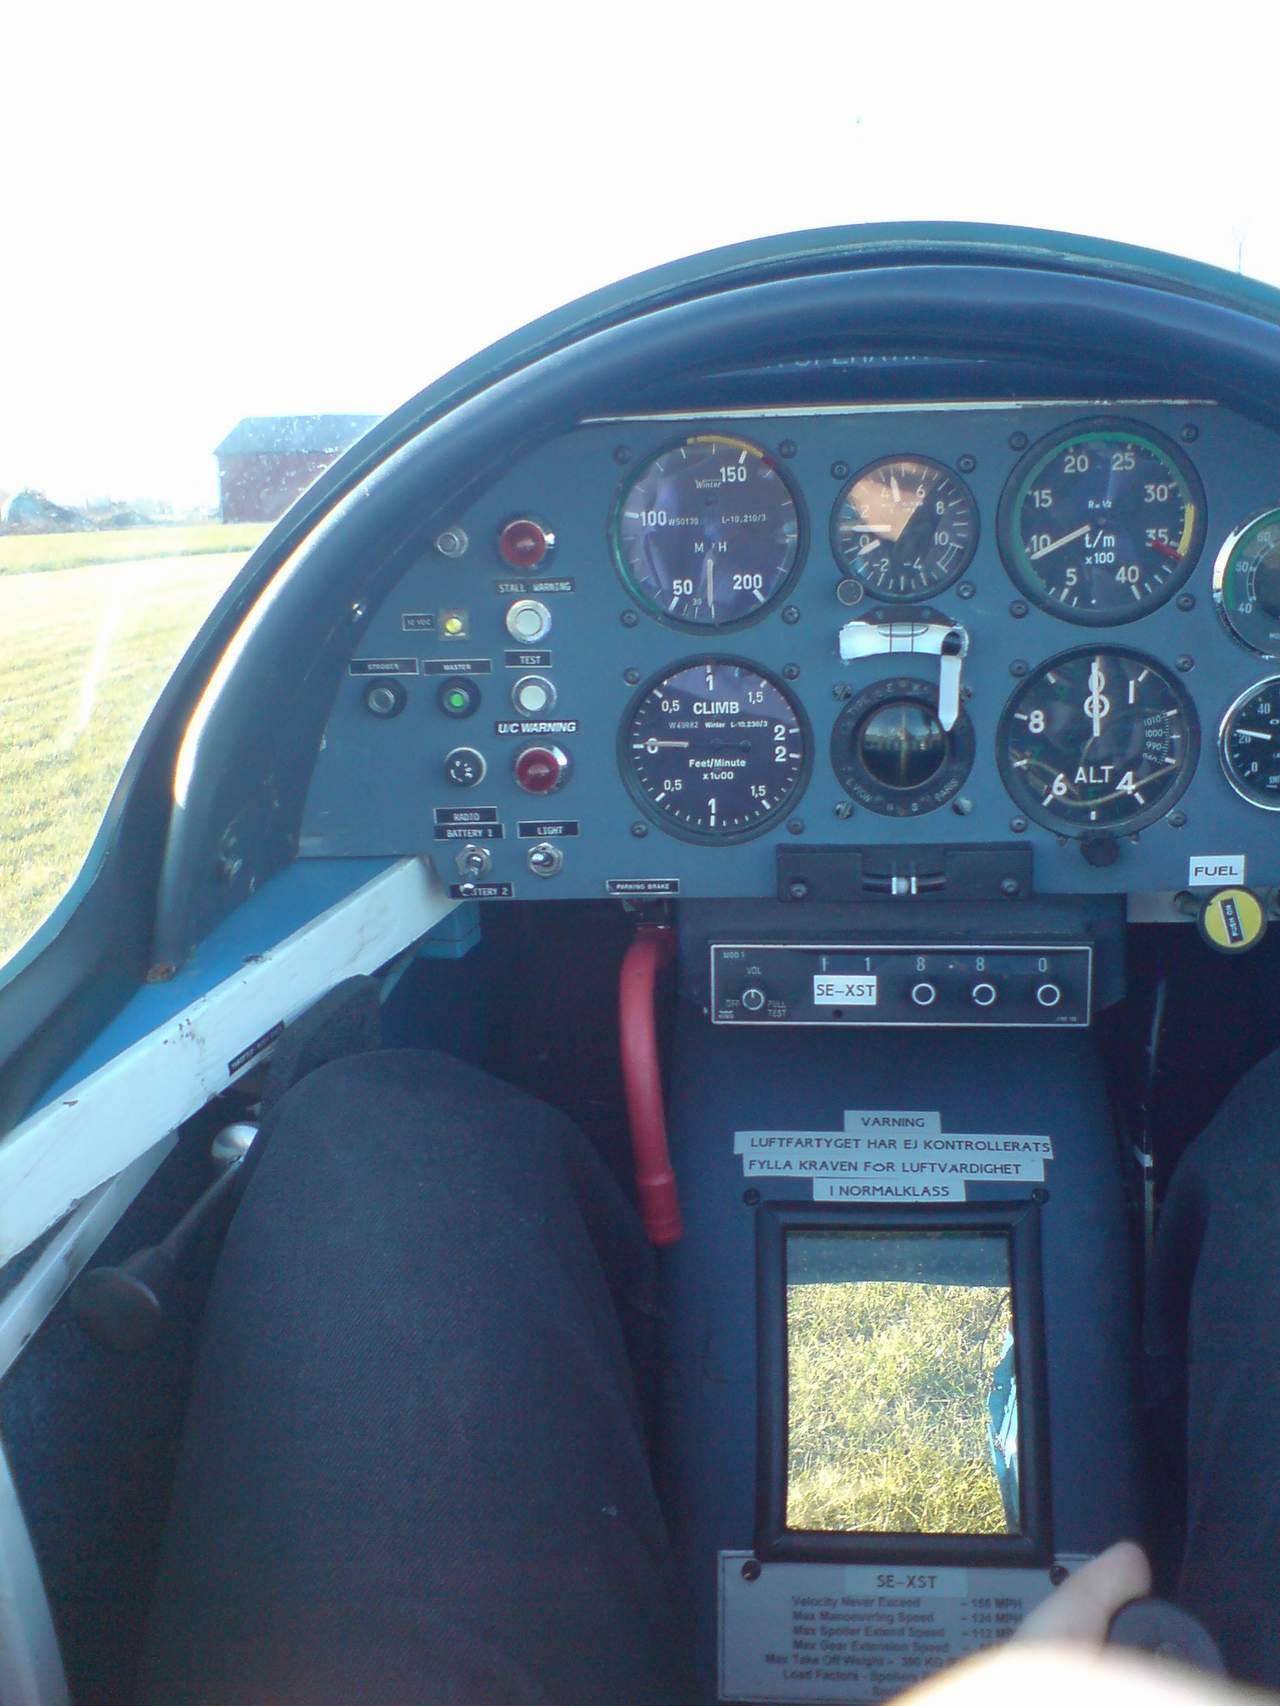
I feel more confident in the 4 partly because XST has a window in the wheel-well cover. I haven�t seen that in cockpit pictures on other RF 4�s. When the wheel is down in the air you can see straight below you; the fence, the neighbours horses and various other items directly underneath that you otherwise would have been blissfully unaware of. Moving things draws your eye, so I automatically glance at the moving ground through the window after I put the gear down. It�s reassuring to actually SEE that the gear is down, but I have made a habit of checking that locking lever too.
The window is also useful to check the ground you�re taxiing on and it greatly facilitates alignment on the centerline when you taxi in tight spots. Don�t tell anyone, but I generally taxi into the hangar and being able to follow the white centerline has prevented banging the wingtips in the hangar doors- so far....
I mostly fly from grass strips. Another advantage of the window is that if the strip is damp you all know that lengthen the take off run A LOT. Sometimes this can be hard to judge, maybe part of the strip has been in shadow, are water bogged or wet for other reasons. If you keep the wheel-window reasonably clean you can see the water drops sprayed from the wheel so you are more prepared to abort your take-off run if you are not airborne were you thought you would be.
I don�t know who in the UK made the modification, but as far as I can see it�s an easy one- just some polycarbonate, a frame and 4 screws. But maybe you all have already installed a Palmcomputer artificial horizon/3Dterrain/highway-in-the-sky contraption in that space on the wheelcover?
Take 5(b) just 4 fun/ J�rgen, SE-UDI, SE-XST
|
eugenio
First Sergeant


Gender: Male
Location: Str. Val S. Martino inferiore 133/7 I - 10131 Torino ITALY
Registered: Oct 2006
Status: Offline
Posts: 294
|
Posted Saturday, November 17, 2007 @ 10:02 AM
You can paint all levers, you can put ten horns and thousands of lights, but you will forget the landing gear up.
The problem is that happens when you are thinking about something else than to the pattern and related things.
My warning stuff works fine, but me too risked to land gear up, but fortunately I am still between those who will have to do it.
Eugenio
|
flyingkroeger
Sergeant First Class

Gender: Male
Location: Melbourne Australia
Registered: Apr 2007
Status: Offline
Posts: 70
|
Posted Monday, May 19, 2008 @ 10:28 PM
Hi Jorgen,
Your slip indicators look interesting, have you got a source for them?
BR
Tim
|
SteveBeaver
General

Gender: Male
Location: Columbus, Ohio - USA
Registered: Jan 2007
Status: Offline
Posts: 454
|
Posted Monday, May 19, 2008 @ 11:20 PM 
How about these? I use one in he RF4 mounted below the compass and sharing the same mounting holes.
http://www.aircraftspruce.com/catalog/inpages/microflight_slipind.php

Steve
|
Jorgen
Captain
Gender: Male
Location: Lund, Sweden
Registered: Apr 2007
Status: Offline
Posts: 835
|
Posted Wednesday, May 21, 2008 @ 05:22 PM
Hi Guys,
sorry Tim but they came with the package from the UK and yes, I�m satisfied with them although the inverted one have a tendency to become unglued at irregular intervalls. I think Bob Grimstead might have the E-mail adress to Mike Woolard who used to own G-AVNX (SE-XST today). He made the latest major overhaul so he might have installed them.
Take 5(b) just 4 fun/ Jorgen, SE-XST, SE-UDI
|
Bob Grimstead
Captain
Gender: Male
Location: Perth, Western Australia or West Sussex, England
Registered: Dec 2006
Status: Offline
Posts: 2029
|
Posted Saturday, May 24, 2008 @ 01:31 PM
Hi Tim,
My inverted slip ball is a Jabiru item. Fits into a normal instrument hole, although I've bolted it below the panel. See the panel pictures pages on CFIAmerica.
yours, Bob
|
Bob Grimstead
Captain
Gender: Male
Location: Perth, Western Australia or West Sussex, England
Registered: Dec 2006
Status: Offline
Posts: 2029
|
Posted Saturday, May 24, 2008 @ 01:33 PM
Oops,
We've got off topic again.
It's easiest to mark the forward face of your wheel lever with alternate stripes of red and yellow PVC ('insulating') tape, and the rear face with a long strip of green tape.
Photos follow when possible.
Yours, Bob
|
Bob Grimstead
Captain
Gender: Male
Location: Perth, Western Australia or West Sussex, England
Registered: Dec 2006
Status: Offline
Posts: 2029
|
Posted Sunday, January 31, 2010 @ 00:48 AM
Hello everybody,
I've been thinking again about this recently, and will soon have some more photos to post.
Meanwhile, here is an e-mail I got from another sufferer.
Fourniers are brilliantly designed, but the one component that causes the most trouble is the main wheel. Forgetting to lower it, or having it retract when you do not want is by far the most common cause of Fournier accidents. If you land with the wheel still up, or it retracts, you smash your propeller and the engine must be completely stripped and re-built, at enormous cost.
Here is a salutary lesson from CFIUK member Neil Grayson:
I'm a member of the UK branch of CFI, owning one of the 12 beautiful SFS31 Milans in the world - D-KIFF. I keep it on the German register, flying over from Boscombe Down to Aachen each July to get my inspector to renew the German C of A.
I've wanted to comment on this wheel warning topic after reading the airtest of your delightful RF4. That's because I cost my insurers �7000 for an engine rebuild and new Hoffmann prop blades (3 position prop) after my wheel didn't lock down.
This is written in the belief that my wheel is like yours within the gear well - although the position of microswitches to complete the warning wheel "not down" buzzer circuit may be different. My previous owner disconnected the throttle-actuated switch - as we had on a Yeovilton syndicated G-AYRL (pranged years ago!) - so you can add a trickle of throttle without that noise, when you wanted to simulate a higher performance glider. My other switch is linked to deployment of the spoilers - buzzing with wheel up and spoilers pulled.
On mine - and I suspect all RF4s - the not down primary contact at the wheel is a sliding switch, making contact when the u/c is up and for about 80% of the arc on the way to the down position, but NOT over that last bit into the slot! So in my case, I saw the main lever do its usual swing forward and it looked OK, but after a 4-hour flight on a hot July day, I was too tired to lean down and check that the downlock was properly in. I made a perfect touchdown on Boscombe's main runway, and after a couple of seconds, the nose lowered, the buzzer went off and there I was sliding along on those marvellous hardwood runners!
In your article, you mention the checks to confirm that the wheel is down. I wanted you to know that I don't think your pre-landing check is positive enough, as the switch on the wheel pivot may not trigger the buzzer if the wheel is dangling down under gravity, but not locked.
The only way to make sure it is down and locked is to push/pull on the yellow release knob (without touching the trigger), to see that it is totally solid. And the lesson is that the buzzer system gives is a warning that the gear is still up, but NOT a confirmation when it's down!
Best wishes, Neil Grayson
|
Bob Grimstead
Captain
Gender: Male
Location: Perth, Western Australia or West Sussex, England
Registered: Dec 2006
Status: Offline
Posts: 2029
|
Posted Thursday, February 4, 2010 @ 00:44 AM
Hi Guys,
You may or may not know that, however much you are in denial, virtually every Fournier pilot subscribing to this forum (and most of the others, too) has either landed wheel-up or (more common) had a wheel collapse.
There are a few ways to ensure this does not happen to you, and most of them are quick and simple.
Take it from me, who has done it, that trying to fix the problem afterwards is most definitely NOT quick and simple.
The first safeguard takes seconds (well, OK, maybe five minutes) and costs cents -- OK, maybe two dollars.
Get a piece of flat plastic - an old credit card maybe, or I use a piece cut from the side of an emptied plastic oil bottle.
Cut it to size.
Cover it with stripes of red and orange PVC tape ('insulating' tape).
Fix it to the vertical rib forward of your wheel lever with double-sided adhesive tape or a 'sticky fixer', so that when your wheel is down, your lever obscures the card.
I also paint or tape the lever green.

This is a good visual cue, which will tell you at a glance on final approach that your lever in not in the correct position.
Yours, Bob
|
Bob Grimstead
Captain
Gender: Male
Location: Perth, Western Australia or West Sussex, England
Registered: Dec 2006
Status: Offline
Posts: 2029
|
Posted Thursday, February 4, 2010 @ 00:56 AM
Before each flight, take a quick glance at your wheel fork casting.
Cracks mostly (although not always) start where the moving part (on the left here) hits against the stationary part as the suspension bounces up and down.

Thus:


Although they do also start at the wheel lock-up cut-outs in the upper part.
This is probably caused by retracting the wheel too vigorously, whacking it into the UP position and slamming the locking pawls into place in the casting.
Treat your Fournier like a lady, be gentle with her:

I know that many of you have seen these photos before, but some might not have, and I think it's good to have them all on the same thread.
Yours, Bob
[Edit by Bob Grimstead on Thursday, February 4, 2010 @ 00:57 AM]
[Edit by Bob Grimstead on Thursday, February 4, 2010 @ 01:03 AM]
[Edit by Bob Grimstead on Thursday, February 4, 2010 @ 01:05 AM]
|
Bob Grimstead
Captain
Gender: Male
Location: Perth, Western Australia or West Sussex, England
Registered: Dec 2006
Status: Offline
Posts: 2029
|
Posted Thursday, February 4, 2010 @ 02:26 AM
Okay Guys,
Ren� Fournier�s retracting wheel is a magnificent design, with effectively only two moving parts and three operating levers, but it does suffer from failures (both human and mechanical) so I�ll try to run through them. I believe there are five main failure modes, although pilots being pilots, I am sure others will appear with time.
1) If the wheel is not properly locked up after take-off, it can smack down under G, causing a lot of damage.
2) If you forget to lower the wheel, you can do a lot of damage.
3) If you lower the wheel but do not thoroughly check that it is properly locked into position, it will collapse on landing.
4) Cracks in the casting can cause a collapse.
5) Pushing too hard, too often on the main lever (lever 1) has caused fatigue cracking in the weld at the bottom.
Here is a photo of the whole retractable wheel mechanism.
As seen here, this is actually extended a little past the properly locked-down position, illustrating the first problem mentioned above.
This is how the mechanism can end up after an inadvertent in-flight extension.

There are three castings.
Let�s call them Casting A, the fixed portion which is bolted by seven bolts though the fuselage main bulkhead.
Casting B is the long piece, which goes up and down on retraction & extension.
This is where the cracks happen.
Casting C is the U-shaped yoke into which the wheel fits.
There are three operating components in the cockpit.
Let's call them lever 1. This is the big, long lever with casting B on the bottom end of it, the handle of which I paint green on the rear face and striped red & yellow on the forward face.
As the wheel retracts, this moves from a vertical position beside your right knee to lie flat beside your seat.
I call it the main lever.
Lever 2 is the smaller, near vertical lever with a knob on it.
In this photo, the knob is painted white.
I call it the locking lever.
Lever 3 is the little, near horizontal white one with a trigger on the forward end of it.
This locks lever 2 in place.
I call it the safety latch.
Lever 2 operates a pair of arms with lugs on the end.
These lugs fit into the up- or down-lock cut-outs in casting B.
They are pulled into place by strong, tension, coiled springs.
If anybody can annotate this photo with the appropriate numbers and letters, I would be very grateful.
Yours, Bob
[Edit by Bob Grimstead on Thursday, February 4, 2010 @ 06:07 AM]
|
Bob Grimstead
Captain
Gender: Male
Location: Perth, Western Australia or West Sussex, England
Registered: Dec 2006
Status: Offline
Posts: 2029
|
Posted Thursday, February 4, 2010 @ 06:24 AM
WGN's latch (lever 3) has never fitted properly, so I have always had to wiggle locking lever 2 back and forth to get it to slip into the notch under lever 3.
Provided I do that after checking lever 1 is either fully forward or fully down beside me (after both retraction & extension, AND as part of my HASELL checks just to be sure) I have not (so far!) had another problem.
This is what I do, and since I have suffered three of the above failure modes, I suggest we all do this every time...
After take-off, once there is no longer enough runway ahead to land on:
Gently retract the wheel.
Once it is up, I gently push AND PULL on lever 1 beside me to ensure it is locked up.
Then lean forward and gently move lever 2 fore and aft to ensure the lugs are properly engaged in the lock cut-outs in casting B and lever 3 has locked into place.
Before flying aerobatics, as part of my HASELL checks I repeat steps 3 & 4 above.
Before landing, I extend the wheel and then loosen my shoulder harnesses to gently push AND PULL on lever 1 to ensure it is correctly locked down.
Some people just push it with their foot, but I believe this is not a sufficiently precise way of ensuring it is locked.
Also it can contribute to the cracking in 5) above.
Then I gently push & pull on lever 2 to ensure the lugs are properly engaged in the lock cut-outs in casting B and lever 3 has locked into place.
If in any doubt, I re-cycle the wheel mechanism ONLY ONCE.
If I'm still dubious, I make a high final approach, stop the engine, position the propeller horizontal, and land gently, sideslipping as required.
THE REALLY IMPORTANT THING TO UNDERSTAND IS THAT THE HORN AND LIGHT ARE UTTERLY USELESS WHEN IT COMES TO CONFIRMING YOUR WHEEL IS DOWN!
All they MIGHT tell you is that you've closed the throttle or opened the spoilers and it is still up.
I don't ever again want that wheel to go down or come up when I don't want it to, so I'm sharing this with you all.
Good luck Guys.
Yours, Bob
|
SteveBeaver
General
Gender: Male
Location: Columbus, Ohio - USA
Registered: Jan 2007
Status: Offline
Posts: 454
|
Posted Thursday, February 4, 2010 @ 09:24 AM
I have added an extra microswitch to the system that is operated when lever 2 returns to its rest position, - that is when the pins are fully seated in their notches. I think this makes the warning horn a better indicator of the true state of the gear system.
Steve
|
jb92563
Second Lieutenant


Gender: Male
Location: Lake Elsinore, CA, USA
Registered: Mar 2007
Status: Offline
Posts: 583
|
Posted Thursday, February 4, 2010 @ 11:32 AM
Steve,
I like your microswitch idea on lever 2 since it can only be safely considered locked when it drops into the notch.
Do you have any pictures or a sketch on how/where you mounted it.
I think I'll add a seperate LED panel indicator to indicate LOCKED to go along with that extra microswitch.
So far I have been lucky but have already experienced some uncertainty of whether the gear was locked down, as I was having a
bit of trouble one day engaging/disengaging lever 2.
Before the next flight I shot a lot of dry graphite lube into all the moving parts to keep things moving easily and it seemed to help.
In retrospect that graphite conducts electricity, I beleive, and I can only hope I did not get any into the microswitches.
Thanks Bob for empasizing the proper operation of the gear, I have been slamming it up a bit too hard, now that I have read this,
under the assumption that a vigorous retraction would help lock the gear up.
I can see the danger of that habit now an will adjust my technique according to your suggestions.
--------------------
Ray
RF4D #4057 N-1771 Rectimo 1400cc
http://picasaweb.google.com/jb92563/FournierRF4D
http://www.touringmotorgliders.org
|
Bob Brock
Master Sergeant

Gender: Male
Location: Portland, Oregon
Registered: Mar 2009
Status: Offline
Posts: 156
|
Posted Thursday, February 4, 2010 @ 01:02 PM
Thanks for this great information... since my gear is out, I will do a complete clean-up and inspection. My wheel has come down when I thought it was locked in the up position. I cycled it in the lift and noticed that part of the gear pushed up the snail. Like Jorgen, I have a window in the snail and love it... it helps to confirm the position and then comes the checking to make sure it is locked up or down. Nothing beats the visual confirmation... and the window really helps keep the wheel on the taxi line.
|
SteveBeaver
General
Gender: Male
Location: Columbus, Ohio - USA
Registered: Jan 2007
Status: Offline
Posts: 454
|
Posted Thursday, February 4, 2010 @ 02:48 PM
The switch is simply mounted to the plastic wheel cover on the pilot side of the lever. Two 3mm machine screws pass through with the heads on the wheel side of the cover and the nyloc nuts on the switch side. One hole is round, the other a slot to permit adjustment. I also used a thin wooden spacer to get the alignment just right.
Steve
|
jb92563
Second Lieutenant
Gender: Male
Location: Lake Elsinore, CA, USA
Registered: Mar 2007
Status: Offline
Posts: 583
|
Posted Monday, May 3, 2010 @ 10:57 AM
This weekend I nearly joined the wheel up club and caused me to reflect on the gear warning horn defeat switch I installed along with the Flashing LEDs to indicate gear up in a landing configuration.
The thing that saved me was that I was coming around on to final full spoilers too high and not going down all that fast with a 20mph left front quarter x-wind.
At about 50 ft I retracted the spoilers and hit the throttle to go around and as soon as I took a quick glance to reach for the throttle I saw my LED gear up flasher and realized my gear was still up.....whew!
The first clue should have been the warning horn which I had defeated with the switch since I was puttering around at idle and could not stand to hear the horn any longer as I was coming down from 7,000 MSL.
The second clue should have been the insufficient sink rate with just the spoilers. Gear down adds just the right amount of extra drag that I have gotten used to.
In pondering my actions and inaction I think an easy fix would be to affix a prelanding checklist to the wheel well cover with a clear window into the wheel well next to the gear down item...."If theres light its right"
But in considering my habbits in the downwind, spoilers are always actuated if for no other reason than to see that they are functional.
I think another microswitch for the spoiler handle would be fairly easy to add, that will sound the horn, bypassing the horn defeat switch.
--------------------
Ray
RF4D #4057 N-1771 Rectimo 1400cc
http://picasaweb.google.com/jb92563/FournierRF4D
http://www.touringmotorgliders.org
|
Jorgen
Captain
Gender: Male
Location: Lund, Sweden
Registered: Apr 2007
Status: Offline
Posts: 835
|
Posted Monday, May 3, 2010 @ 03:13 PM
Thanks for sharing Ray,
I can vouch for the snailwindow which I find very reassuring on final. But as Eugenio said, the Bells and Whistles needs to be in your head so you realise what's hapening- and you did!
I had a very nice 4-flight yesterday myself, part of it as a wingman of a beautiful 1943 Stearman, part of it thermalling and some aeros too. I really can�t think of a more fun airy to play with. I had my camera with me but forgot to take pictures- sorry about that, I guess you just have to take my word for it...
May the 4's be with you/ J�rgen
|
Bob Grimstead
Captain
Gender: Male
Location: Perth, Western Australia or West Sussex, England
Registered: Dec 2006
Status: Offline
Posts: 2029
|
Posted Tuesday, May 4, 2010 @ 03:01 AM
Hiya Jorgen, Ray, Steve and all,
Thank you so much for sharing your Fournier experiences, both good and bad.
The day I landed wheel-up, I had to sideslip all down final and my brain was thinking 'This is weird, I don't usually have to do this', but being only a simple brain, it thought no further. If my brain had bothered to continue the thought to 'I wonder why?...' I might have realised and put down the wheel --- or maybe not.
Steve, I had not read your post on this thread, so I am sorry for not having congratulated you for a good idea. That additional microswitch seems so sensible. Could you possibly take a photo and post it for us please?
One picture being worth a thousand words etc.
Of course, what we really need is a big red banner that pops up from the upper cowling to obscure the forward view if our height gets below 200 feet and the wheel is not securely locked down.
And I guess some days I might not even notice that!
Yours, Bob
|
|