Posted by dannparks on Sunday, May 9, 2010 @ 10:31 PM:
After a lot of thought, reading posts on the board, and a few experiments, I have decided to recover N2188 with the Polyfiber/Polytone system -- including all the plywood structures. I had initially planned to cover the plywood with fiberglass and paint the whole plane with polyurethane, but two things changed my mind:
1. I had some problems covering the large surfaces with fiberglass and not sanding through it in the process of trying to smooth out the surface. It also seemed a lot of work smoothing out the wood, and then going through the whole smoothing out process again with the fiberglass. I know a lot of people are making the fiberglass process work well for them, but I was having second thoughts.
2. The most important reason for going Polytone was that I knew I could spray it myself. I had bad reactions trying to spray Polyurethane on my RV (even with a respirator system) and ended up paying someone to do it. That is not an option for this project, and I knew that Polytone was super-easy and not as toxic.
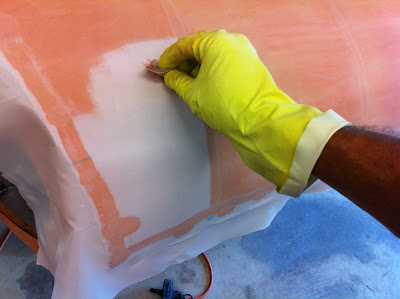
So the only concern I had was how to smoothly attach the Polyfiber cloth to the plywood areas and shrink it as well. A friend told me to spray a heavy coat of Polybrush on the surface, drape the cloth over it, and use a cloth soaked in MEK to activate the Polybrush through the cloth and adhere it to the wood. That process has worked very well.
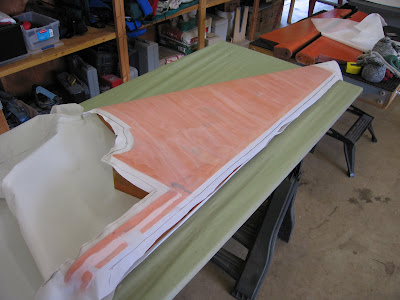 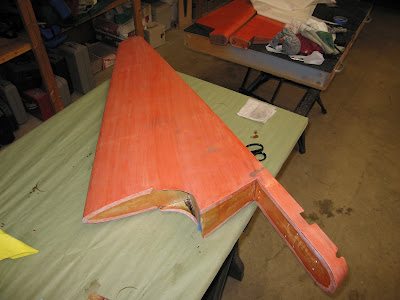
After a perimeter is tacked down, I use the iron to begin shrinking, and sub-dividing the areas, and shrinking more. This allows the cloth to be shrunk and stuck down into the concave areas -- rather than floating over the top of them. After the entire surface is attached, it is brushed and sprayed with Polybrush per instructions.
This worked well for the vertical and horizontal stabilizer, and I think it will work just as well for the fuselage. It should allow covering the fuselage with a slow pace. And the nice thing about this system is that once it is covered, most of the work is done -- the only sanding is between the remaining Polyspray and Polytone coats. It won't have the shine of Polyurethane, but the paint goes on really easy.
I'll post more pictures as parts are covered. I hope to do the fuselage this summer so I can build and mount the engine over the winter. Thanks for all the advice from forum members.
--------------------
Posted by jb92563 on Wednesday, May 12, 2010 @ 10:46 AM:
Dan,
If you want the shiny look then the Hipec system is what you want to use.
It is similar to the poly spray process but gets you a gloss finish.
I have it on my wings and its really nice.
I need to do a fuselage recover this winter and will likley use the Hipec system as this stuff is quite tough, flexible, does not mar easily and retains a great refleective gloss finish for eons.
My wings had been Hipec covered 17 years ago and it looks like new still with no signs of fading or UV damage.
--------------------
Posted by dannparks on Wednesday, May 12, 2010 @ 02:12 PM:
I had looked at HIPEC and got one of their info booklets. I was impressed with the toughness and small amount of steps in application and I think it could work very well for any RF. The problem was that it is still a cyanate-based polyurethane (very toxic), and that gave me all sorts of alergic reaction problems trying to spray Ranthane on my RV-- even with a full fresh air breather rig. Polytone is a vinyl solvent-based system that requires only a basic respirator. It's possible that the specific chemicals in HIPEC might not have caused a reaction, but I didn't want to chance it. The Polytone might not be as glossy, but it sprays easy and I can be around it without adverse issues.
I definately recommend testing any paint system you want to use for everything from ease of application to health issues. It also tests your enviromnent for dust, your equipment and skills as well. I was suprised how difficult it is to paint such a large thing.
Good luck on your fuselage recovering this winter.
--------------------
Posted by Jorgen on Wednesday, May 12, 2010 @ 04:41 PM:
Hi Guys,
good discussion, excellent points Dan. Be careful out there, remember the sum surface of your lung alveoli is about the size of a tennis court, so there is ample possibilities for solvents to enter your system...
May the 4's be with you/ Jörgen
Posted by dannparks on Sunday, May 30, 2010 @ 08:05 PM:
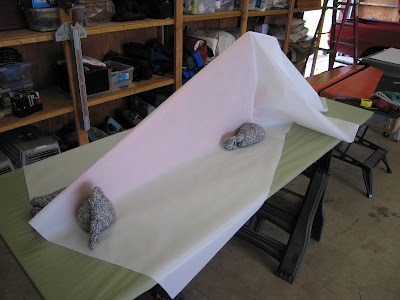
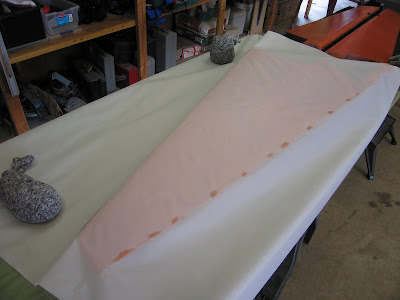
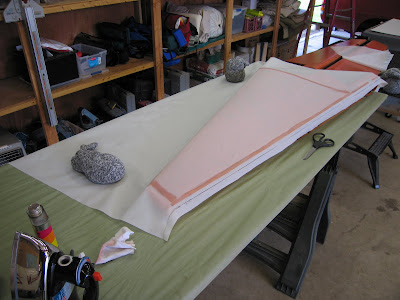
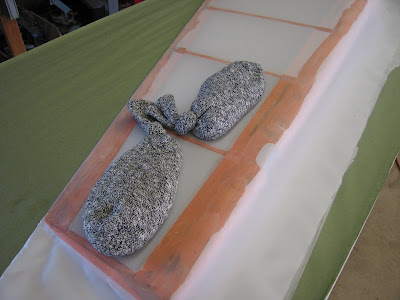
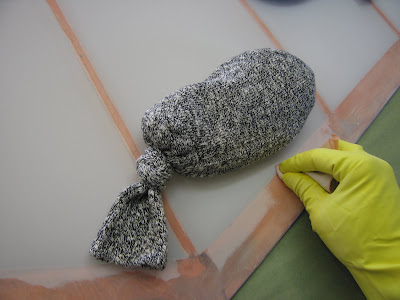
Continuing work covering the control surfaces. The socks are filled with rice to act as weights to hold the cloth against the frame while the pre-sprayed glue is activated with MEK to adhere the fabric before final shrinking.
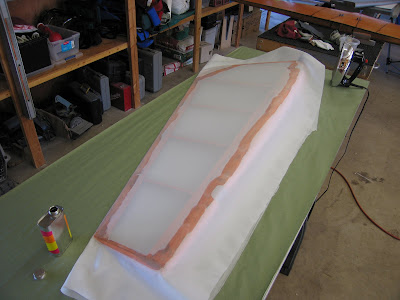 
Overall it is coming out OK. A few lumps in spots. I'm learning how to prevent this as I go. It's quite different covering all this wood surface as opposed to a tube framework where the surface is almost all stretched fabric which is inherently flat. I figure by the time I'm done, I know enough to want to start over. 
--------------------
Posted by dannparks on Tuesday, September 21, 2010 @ 00:20 AM:
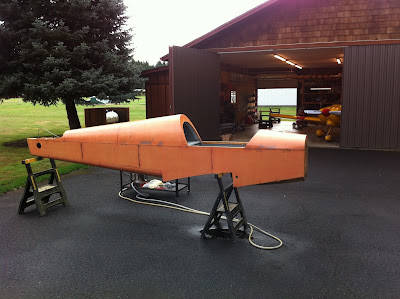
Update on fuselage covering...
I finally got the fuselage all striped and cleaned up and ready to cover.
 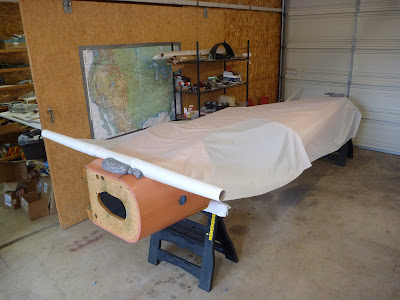
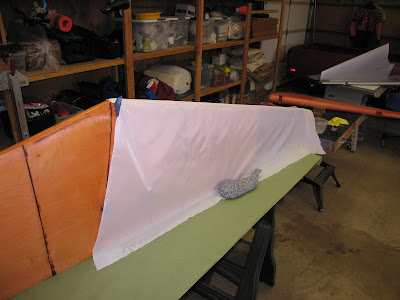
Sprayed on 2 heavy coats of PolyBrush. And laid out the lightweight glider cloth. I decided to put the seam on the top and bottom. I am overlapping the fabric 1", but it should not be too visible. The cloth is very thin.
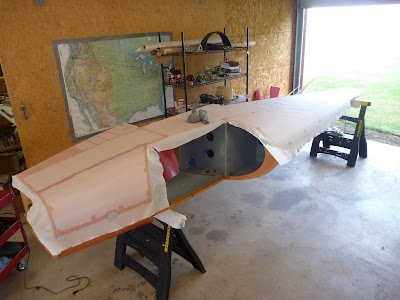 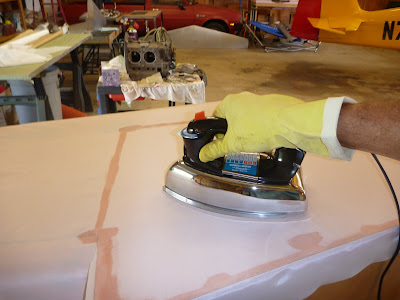
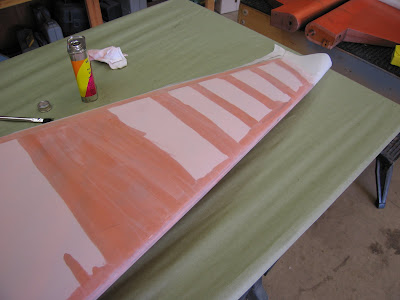
Then used the same procedure as the control surfaces to tighten the fabric wiping with MEK to activate the glue and stick the fabric down. Creating a perimeter of attached fabric allowed the iron to tighten the fabric inside the space.
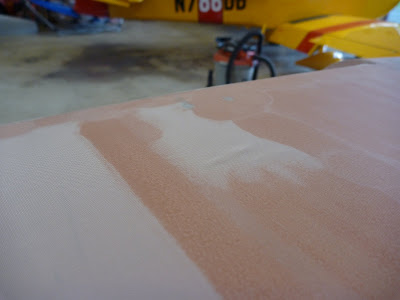 
Use the iron to remove wrinkles the might appear. By not getting the fabric too tight, you can push the fabric into concave areas. I had filled the concave areas of the fuselage, so this wasn't an issue as it was for the control surfaces. Larger areas could be wiped at one time on the curved areas. This might seem like a tedious job, but it was the only way I could be sure the cloth was tightened and stuck down without air gaps underneath.
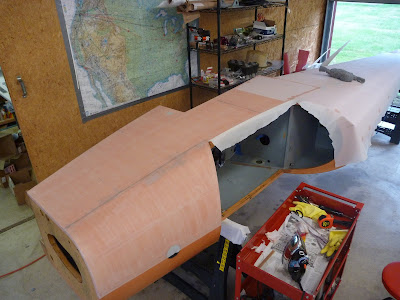 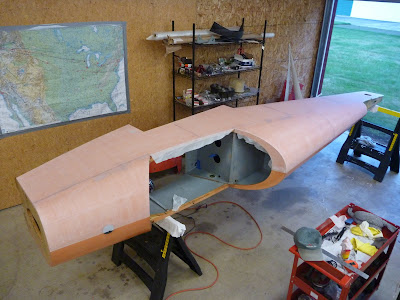
Almost done and the right side completed. The covering process for one side took two days -- including spraying the PolyBrush. A lot shorter than I thought. Now that I know what I'm doing, I should be able to do the other side in one day. The fabric might seem like more work than fiberglass, but once it's covered, it's essentially done. No heavy sanding, filling, etc. just paint.
Now the fun part .. painting. And then assembly! (But I still have the wing to do)
--------------------
Posted by Jorgen on Tuesday, September 21, 2010 @ 06:44 AM:
Dann,
that looks great! Very nice presentation, thanks for spending time to share it with us.
What did you use as a filler?
May the 4's be with you/ Jörgen
Posted by dannparks on Tuesday, September 21, 2010 @ 10:51 AM:
I used some stuff called Super Fil to fill concave areas on the fuselage. It is a very light weight two-part epoxy filler that is blue in color made by the PolyFiber folks. It is very light and sands easy. I put it down directly on the bare wood. It does take overnight to dry before you can sand it.
I had forgot to mention that there were two coats of epoxy varnish that went down on the wood before the PolyBrush. The varnish is important because it seals the wood. The PolyBrush doesn't stick well to bare wood.
--------------------
Posted by jb92563 on Tuesday, September 21, 2010 @ 11:28 AM:
Looks great Dan!
Thanks for sharing your techniques, I will be doing a recover of the fuselage as well over the winter.
I think I'll try the rudder first with the Hipec system to make sure I can tolerate the stuff and do a decent job
like you suggested.
I'm trying to come up with an interesting paint scheme that captures the excitement and flair of the RF4D but
retains a bit of the traditional style as well since it has to match the wings.
Are you going traditional or your own creation with the paint/pattern?
I like your Orange design.
--------------------
Posted by dannparks on Tuesday, September 21, 2010 @ 12:06 PM:
Good question. I have been debating the paint scheme since I started the project. The original scheme is nice, but has a few too many small flourishes and stripes for my taste (and a pain in the neck to mask and paint). I noticed in Europe about half have different paint schemes.
I have been working on kind of a modernization of the traditional scheme with fewer stripes. However, there is a strong case for maintaining tradition on these rare birds, and people (surprisingly) recognize the original scheme.
So, is it tradition or modern? What do other folks think about paint schemes?
--------------------
Posted by Markku on Tuesday, September 21, 2010 @ 01:48 PM:
| Quote: |  | | Originally posted by dannparks
So, is it tradition or modern? What do other folks think about paint schemes?
|
|
I have that same job ahead, and the idea is to keep it as close the original as possible
Posted by Jorgen on Tuesday, September 21, 2010 @ 04:12 PM:
Hi Guys,
I am an "originalist" too, but maybe that is pure "Pavlovian conditioning". You remember the russian who made an experiment with dogs and chimed a bell everytime he fed them, eventually they started to salivate as they heard the bell- and there's reason to believe a visual stimulus can do the same. So as soon as I see the (original) paint scheme on SE-XST I get a rush of anticipation- I know I'm in for another memorable ride!
Don´t you worry 'bout a thing Dan, I think this little aeroplane will "grow on you" as you start flying it and you´ll fall in love with it regardless of what colour and scheme you paint her in- there is scientific evidence of that! However, I do think that historical accuracy has a value and also remember that "our taste" is not a constant. Would you be comfortable wearing (costumeballs excluded) the clothes you had in the 70-ies today?
You also have to decide how much original/historically accurate you want to be. For instance, SE-XST was white and "British racing greene" when leaving the plant at Dahlemer-Binz 1967, but I think I prefer today's blue/white (which incidently is called "Ford Electric Monza Blue", if I remember correctly). To conclude: there are many nice paint schemes out there, but René's has a certain timeless quality that shows the RF 4's glider heritage- which is why I feel as comfortable "wearing" SE-XST today as I would have been in the 60-ies!
May the 4's be with you/ Jörgen
[Edit by Jorgen on Wednesday, September 22, 2010 @ 05:16 AM]
Posted by Bob Grimstead on Wednesday, September 22, 2010 @ 07:43 AM:
Hi Dann, Guys,
Remember, Rene wasn't just an airplane designer. He is also a ceramicist and artist (plus violinist etc, etc).
That man has great eyes, and I believe he designed the best possible scheme for his shapely little airplanes.
But beware!
Many Fourniers seem to carry their original scheme, but only a very few have got it right.
For instance, the twin cheat lines on the fuselage sides start at very specific widths and separation, and taper down to a point at the tailplane (horizontal stabilizer) attachment. The fin (vertical stabilizer) flash has a very specific width and placement.
Many of those airplanes out there that look 'about right' are actually quite wrong.
If you compare Matt's G-AWEK with my G-AWGN you will see significant differences.
His is right and mine is wrong, although it has carried its current scheme since 1970 (when it got a replacement fuselage).
Look at the curve between the lines on the forward fuselage.
Matt's has Rene's original, graceful shape, very similar to the wing's leading-edge profile.
Mine is just a blunt semi-circle.
We know Matt's is correct, because he assigned me the laborious job of tracing out the original scheme before stripping off the original paint.
All I am saying is, do be sure you are truly looking at a proper, original shceme when you're making your decision.
And if you go for the original scheme, please try to get it right.
For the original scheme, see the very early photos, brochures, articles etc.
Yours, Bob
Posted by dannparks on Thursday, July 21, 2011 @ 01:56 AM:
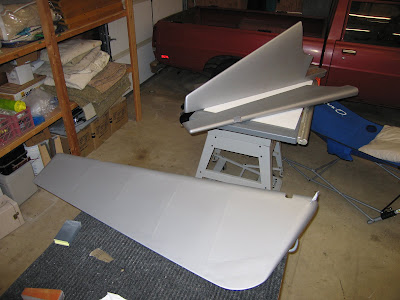
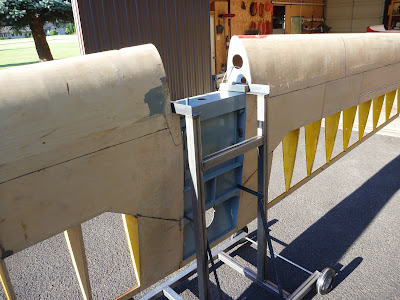
I'm starting to recover the wings now. I made a clone of Bob Brock's excellent wing dolly (thanks Bob for posting all the detailed photos on your Picasa site). I simplified it by not making it tilt. Holding the leading edge up is all I need for cleaning up, covering and painting. It also makes it a bit narrower since it doesn't have to support the shifting weight. Here are a few shots.
 
--------------------
Posted by jb92563 on Thursday, July 21, 2011 @ 09:56 AM:
Wings are underway...hooray!
Maybe You will even get paint on them before the cooler weather sets in.
Poly Fiber has a minimum application temperature of 60 F so you should be good
through September I think unless you plan to heat your painting space.
You are making great progress...awesome!
Ray
--------------------
Posted by Jorgen on Thursday, July 21, 2011 @ 03:34 PM:
Dann,
that's really inspiring. As has been noted in earlier posts I think you are in a very good position for the "most tidy Fournier fortress around"-title. I certainly envy you your shop. I guess your Van's project brought that as a partial side effect?
May the 4's be with you/ Jörgen
[Edit by Jorgen on Thursday, July 21, 2011 @ 03:35 PM]
Posted by dannparks on Saturday, July 23, 2011 @ 02:44 PM:
Jorgen, I hadn't really thought about it, but now that you mention it, the RV-6A took 9 years to build, and that required developing a methodical and disciplined approach to learning, building, setting up shop space, tools, jigs, etc. I'm certain that rebuilding the RF4D would have been quite different had I not done the RV first. I probably would have done a basic fix-up just to get it flying again. What I'm doing now is much more of a challenge and only possible for me because of the experience making the RV. Also, I made the RV with the help of a huge on-line RV builder's group. That's one of the reasons why I like to participate in this group. I'm hoping it will be of help to others -- as it is to me.
--------------------
Posted by Jorgen on Saturday, July 23, 2011 @ 04:15 PM:
I certainly agree and that's why I think your project is inspiring. I think your approach will pay off and I admire your way of not shying away from not-so-simple but much more elegant solutions. I can't wait to hear (sic!) what your mufflers will sound like and how the Diehlcase and starter will work.
May the 4's be with you/ Jörgen
Posted by dannparks on Sunday, August 28, 2011 @ 00:00 AM:
My entry in the "cover the wings" race -- although I think Bob Brock already won since his is in the paint booth...
 
I've covered the bottom on both sides. Working on the tops next week and the D-sections after that. Hopefully I can get it painted before rain sets in.
--------------------
Posted by jb92563 on Monday, August 29, 2011 @ 10:22 AM:
Looks fantastic, beautiful job.
Go Dan Go!
I love the way a freshly covered wood plan looks just before getting paint.
--------------------
Posted by dannparks on Thursday, September 15, 2011 @ 05:13 PM:
The wing is in the paint booth. Inside of a week, it went from 90 degrees (too hot to paint) to 60 degrees (too cold to paint) around here.

However, the weather looks good for the next couple of weeks, so I should be able to get it done. The stripes will be exactly like the original.
--------------------
Posted by Jorgen on Saturday, September 17, 2011 @ 04:12 AM:
Good call, Dann! I can't wait to see your results.
May the 4's be with you/ Jörgen
|