Posted by dannparks on Monday, May 16, 2011 @ 03:09 PM:
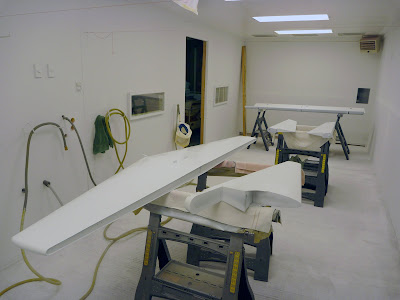
Well, I never thought it would happen, but I have started painting. Luckily, a neighbor has a nice painting space in his shop, so I have been able to get started even if spring has not arrived here yet.
The Polytone paint goes on really easy and I like the semi-gloss finish when you lay down a nice wet coat.
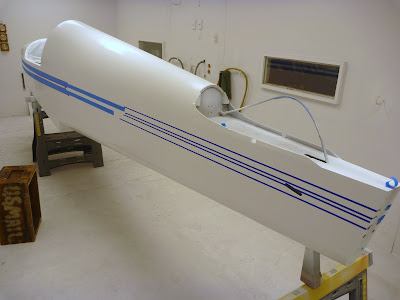
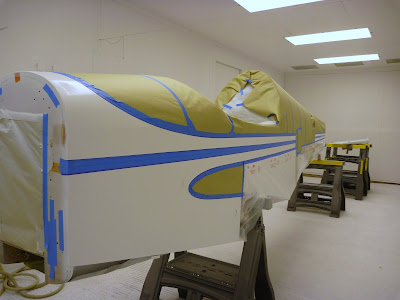
I think I have also settled on a paint scheme. It was a big dilemma between the classic original and a more modern (to me) interpretation. I decided on a combination of the two. It uses the original classic design from the wing forward (I like the visibility the red leading edge offers). The sides stripes are a little different because I want the centerline of the side stripe to line up with the centerline of the muffler, so the top portion of the stripe is lowered a bit -- making the side stripe thinner overall. The rear portion is more contemporary with no stripes on the empenage and a text treatment with the chevron on the tail. The rudder is red, as on my RV6A, as an homage to the Tuskegee Airmen.

It's great to see all the activity on the US West coast projects, and thanks again to everyone for their guidance and inspiration.
--------------------
Posted by jb92563 on Monday, May 16, 2011 @ 04:46 PM:
Hurray....another one getting paint!!!!
Nicely done blend of old and new.
I wonder if we should get a sticker made of the "Fournier RF4D" instead of trying to paint it?
I'd buy a couple.
--------------------
Posted by Jorgen on Monday, May 16, 2011 @ 05:25 PM:
Nice going!
I think your paint scheme looks great and I don't think you will regret staying close to the original. Your muffler mod sure is interesting enough to warrant altering the paint accordingly and omitting some of the stripes only emphazises the glider breed the 4 is part of. Keep us updated, will you?
May the 4's be with you/ Jörgen
Posted by dannparks on Thursday, May 19, 2011 @ 11:15 AM:
I plan to have the emblem cut as a vinyl mask so I can paint it to match the rest of the plane. But I could post the file somewhere so you could take it to a sign shop and have a sticker made in any color.
I'm now painting the fuselage. The painting goes quicker than I thought it would. I think the striping might take a while to get right. I need to set the fuselage on the wing and put the fairing in place to precisely mark where the lower side stripe curve meets the wing -- and get the overall curves correct. It is a little lower on the side than the original.
--------------------
Posted by Bob Grimstead on Thursday, May 19, 2011 @ 12:51 PM:
That's a lovely color scheme Dann.
Good luck with getting it all to work out in practice.
Yours, Bob
--------------------
Posted by jb92563 on Thursday, May 19, 2011 @ 04:38 PM:
Sure, you can email the file or link it so I can make a copy.
My email is jb92563@yahoo.com
I think a Mask is a good idea rather than a sticker so it can be painted on permanently.
A tip with masking I heard somewhere to prevent bleeding under the mask:
1) Apply mask
2) Shoot a light coat of the base color down first (White in your case) so that it seals the mask edges
where the paint might bleed under the mask (White bleeds under the mask on the white background = Invisible).
3) Shoot the top coat color (Black).
4) Remove the mask and behold the bleed free sharp edged lines.
Also, masks and masking tapes should not remain on existing paint for more than a day or two to avoid mask adhesive problems damaging things on removal.
I have heard of tape left on too long and chemically bonding into an underlying new paint job, making a big mess, as some paints may initial cure/dry in hours but not fully chemically cured for 30 days.
[Edit by jb92563 on Thursday, May 19, 2011 @ 04:47 PM]
--------------------
Posted by Jorgen on Thursday, May 19, 2011 @ 05:27 PM:
| Quote: |  |
1) Apply mask
2) Shoot a light coat of the base color down first (White in your case) so that it seals the mask edges
where the paint might bleed under the mask (White bleeds under the mask on the white background = Invisible).
3) Shoot the top coat color (Black).
4) Remove the mask and behold the bleed free sharp edged lines.
|
|
GngngngaaaAAARGH,
why didn't I think of that obvious solution when I painted the new registration on XST- I never got it quite right! Thanks a bunch for that Ray, it will help me in the future when I finally get around to sand down the hideous result and do it all over again.
Otherwise I thought at the time I had such a nice and simple solution:
-print the regs on a computer printer
-tape the pages together
-cut out the letters with a sharp knife
-spray the backside of the template with water soluble glue spray
-glue the template on the prepared fuselage surface
Unfortunately I had a lot of bleeds that could probably have been avoided with your suggestion. When I get around to do it over again I will experimented with different paper qualities and also try your method. Thanks again for the tip.
May the 4's be with you/ Jörgen
[Edit by Jorgen on Thursday, May 19, 2011 @ 05:38 PM]
Posted by dannparks on Thursday, June 2, 2011 @ 01:28 AM:
Fuselage mostly painted!

Working on the Zolatone inside and cleaning up some goofs and smudges. I tried Ray's suggestion and dabbed a couple drops of white paint at the places where the tape crosses over (90 degree angles) and it worked great. It filled the gap with white and stopped the red from running underneath. Thanks Ray!
The number stencils come tomorrow and get painted this weekend.
--------------------
Posted by Jorgen on Thursday, June 2, 2011 @ 06:02 AM:
Absolutely stunning, Dann!
It looks like you really nailed that "sensual", leading edge-like lower curve and like Bob stated in an earlier discussion I also really feel that's a major feature in the great looks of the original colour scheme. Great job battling that mask bleed, can't wait to see your progress, really inspiring!
May the 4's be with you/ Jörgen
Posted by jb92563 on Thursday, June 2, 2011 @ 10:34 AM:
Wow, your fresh paint job looks awesome, and your trim work looks fantastic!
Glad the tip helped.
I should find myself at the same stage in about 2 weeks.
What kind of masking tape did you use, would you use it again of pick something else?
--------------------
Posted by Bob Brock on Thursday, June 2, 2011 @ 07:33 PM:
Wow!!! That really looks wonderful. I am going to take N2275 back to the original red and white but mine came from the factory without the red leading edge. Your red curves are fantastic.. how did you do it?? I am about four or five weeks for painting. Bob Brock
Posted by dannparks on Thursday, June 2, 2011 @ 11:31 PM:
All the striping was done with 1/4" 3M 471+ tape (similar to 3M fine-line). It is a vinyl tape that makes a smooth paint edge and can make sharp curves, but can't be pulled to make straight lines or it will stretch. The solution (taught to me by a very experienced aircraft painter named Dan Mauer a couple days before I did this) is to use regular blue painter's masking tape to pull the straight lines on the "paint" side of the stripe (it can be pulled tight without stretching), and then go against the outside edge of the painter's tape with the Fineline tape to make a straight line. Then pull off the painter's tape. Here are some photos in progress.
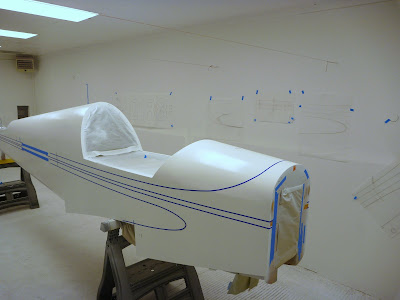 
You also get to see somewhat what the stripes will look like painted (blue) first, rather than only seeing outlines. I followed the straight line of the blue tape, then broke off the line for the curves -- all with one piece of tape so there were no tape joints.
The other important part was that I made full-size tracings of the original lines before I took off the old fabric, so I could use them as a guide for the important curves. You can see them hanging on the wall. The side stripes are centered 1 1/2" lower than the original, so the bottom curve is modified slightly.
I think the blue painter's tape would be fine for just straight lines, but you need to use the Fineline for curves -- or combinations of curves and straight. You can get Fineline at professional painter's stores or ACS. Hope this is helpful...
--------------------
Posted by Donald on Friday, June 3, 2011 @ 03:48 AM:
Looking very good Dann. In my opinion one benefit of dropping the fuselage lines to centre on the exhausts is that it takes the top line off the cockpit edge thus avoiding an awkward transition and removing a paint edge from a 'high traffic' location.
Posted by jb92563 on Friday, June 3, 2011 @ 10:42 AM:
Great tips on the tape.
I also wondered if anyone knows how the PolyFiber system does on the fiberglass parts.
I was thinking I just need to sand them for good adhesion and then spray the Ranthane right over the old paint.
Not sure if painted Fiberglass needs any kind of primer first.
--------------------
Posted by dannparks on Wednesday, June 22, 2011 @ 09:15 PM:
Fuselage painted -- sitting in the back of the hangar ready for assembly.

Now... to figure out what all these parts are and where they go.
--------------------
Posted by Jorgen on Thursday, June 23, 2011 @ 04:58 PM:
Dann,
looks like a work of art. And of course it is. Looking forward to lots of new quizzes.
Regarding which hole in the firewall some parts should go- looks like that Diehl case necessitated a bigger hole in the firewall?
May the 4's be with you/ Jörgen
[Edit by Jorgen on Thursday, June 23, 2011 @ 04:59 PM]
Posted by Collin on Thursday, June 23, 2011 @ 06:30 PM:
Hi,
Looks great. I like the gray numbers. I will have to stop by soon.
Collin
Posted by Bob Brock on Sunday, July 3, 2011 @ 01:23 PM:
Greetings...
Yesterday both Dann and Collin arrived at my hanger for wing inspection. One of the neat benefits of the forum is seeing how others solve problems. Basically I am following the solutions Eugenio figured out and was kind enough to share (and a million thanks for the hard to get parts that I didn't even know that I needed and would never find in the US)... Dann brought me a copy of his tracing for the red trim so except for the difference in wing trim I hope to have a similar factory like red and white aircraft. I know he spent long hours getting the curves just right and he nailed it! My attempt would never be as good as his. It is going to be really interesting when we get both aircraft together, especially since we took different paths, paint, fabric, fiberglass, engines, etc. Knowing that I need to be at the top of my game to fly with Dann, I want the aircraft to be as light as possible... so the final weigh-in will be interesting. Since I my 4 is gaining a little weight in the finishing process (I think), I have been working on me... down 25lbs for CFI days last year. We went through my parts and solved a few mystery parts, but Dann took pictures of a few we could not place... funny how you take something apart that seems so simple at the time and two years later have no idea where it goes or how it fits. Looking at Dann's pictures it is clear there will be more difference... in his hanger everything is neat and has a place... mine, not so much. Thanks again for the Forum and great friendships!!
Posted by dannparks on Thursday, September 22, 2011 @ 09:58 PM:
Racing the onset of cold and rain...
The wing is white -- awaiting the red striping. We had to add 10' to the paint booth to fit it in. And I finally painted the logo/emblem on the tail. Apologies to Rene for interpreting his name/logo. I wanted something that might be what a brand new RF4 might wear. I also discovered that the Polytone paint shines up quite nicely with some polishing compound, a machine buffer, and some carnuba wax.
 
--------------------
Posted by Jorgen on Friday, September 23, 2011 @ 05:38 PM:
Very nice looking Dann,
you make us all proud I think. Your interpretation of the tailfin is rather true to the original yet individual and I suspect Réne approves that you put his name on there. Regarding carnuba wax- I have also heard that is the stuff to use because it does not contain any silicone (like most waxes) which might cause adverse effects on the paint-fabric bonding, right?
May the 4's be with you/ Jörgen
Posted by Bob Brock on Sunday, September 25, 2011 @ 09:06 AM:
Dann... Wow! You keep coming up with perfect solutions. The logo/emblem looks great. With your permission, I would like to put something very similar on mine. Also, does your aircraft number use the same font? Do you have anything on the other side of the tail?
Today is the first rain we have had for some time... back to Oregon and Washington weather. Last week I finished my fuselage and took it to the painter. He really appreciated your full scale tracings of the trim... pictures will be forthcoming.
Thanks for all your help.
Posted by dannparks on Thursday, September 29, 2011 @ 11:51 PM:
The other side has text with a reversed slant. I'll give the emblem file to Collin and he can post it on the CFI website.
 
The wing is back in shop after painting. They recommend Carnauba wax because it doesn't contain any silicone which will resist paint if it ever needs to be patched or repainted.
--------------------
|