Posted by dannparks on Sunday, March 13, 2011 @ 08:26 PM:
Some shots of the final "dress rehearsal" of the panel in the cockpit before final assembly, wiring, labels, and cockpit painting.
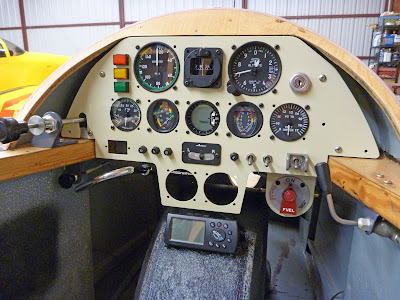

Note the throttle moved above the longeron and a mixture/cut-off control for the Aerocarb below the longeron. Also new fuel valve directly in the fuel lines under the tank. Electric start only, no pull starter.
Tasman variometer that doesn't need a flask. The "dual" oil and CHT gages really screw up the compass, even wrapped with the "mu" metal that Steve suggested. I might still be swapping out some engine instruments.
2 1/4" Holes are for a Microair comm and (future) transponder. The cutout on the left will be battery-powered, vibration-activated hobbs that is only 1/2" deep. I also got the parking brake handled re-chromed.
It's still a long way from completion, but it's nice to finally be in "assembly" mode.
--------------------
Dann Parks • RF4D #4051 N2188 • now flying!
Pictures at: https://picasaweb.google.com/111628310900713778468/RF4D_N2188?noredirect=1
Posted by SteveBeaver on Sunday, March 13, 2011 @ 09:20 PM:
Beautiful Dan! I would never have thought of that color for the panel, but it is perfect. Sorry the mu-metal was not effective. There must be a very strong magnet in there.
Steve
Posted by Bob Grimstead on Sunday, March 13, 2011 @ 10:50 PM:
Hi Dann,
That sure is a lovely panel.
I just have one small comment (don't I always).
I have found that, even with the original matt black-painted panel and standard coaming, there is quite a lot of reflection in the canopy from the lower panel. I suspect your light-coloured and extended panel will make this rather worse, so you might like to consider making a larger, matt-black coaming. There is not a huge amount of room for a longer coaming without the canopy scraping it when it opens, but you can increase the size by about 50 percent from front to rear, and this makes a useful difference in the reflections.
Also, the original coaming material is a hard fibrous board.
It is not likely your head would move forward to hit this in an impact, but if it did, it would hurt.
I have substituted a very lightweight material I found in an art supplies shop.
This is made from two layers of thin matt black card, sandwiching maybe a quarter of an inch of black foam.
It is easily cut with scissors, weighs almost nothing, and would not hurt your face, even hitting it end-on (as you would).
This product (sorry, can't remember the name) comes in sheets perhaps three feet by two foot six (A2?) and each sheet is exactly enough for two coamings, so you have one in reserve for when it gets soaked by rain (after which they go a bit floppy until they dry out wrinkly).
Just an idea.
I'll try to remember to take a photo.
Yours, Bob
--------------------
Flying and displaying Fournier RF4Ds VH-HDO and G-AWGN, building replica RF6B G-RFGB and custodian of RF6B prototype F-BPXV
Posted by Jorgen on Monday, March 14, 2011 @ 09:04 AM:
Hi Dan,
it's VERY inspiring to follow your progress, and short off sitting in the cockpit making engine sounds, fiddling with the panel layout is perhaps every pilot's favourite. I like your layout so far, but have to agree with Bob about reflections and light coloured panels. I also have a stern position on reducing unnecessary inputs in the visual impressions, such as masking/painting screwheads etc. to help reduce the brainload of filtering out "static" in the flow of information.
As for the compass, I never rely to heavily on the "Airpath" anyway, Collin had a nice compass setup on top of his panel.
Might I suggest the Xponder below for your panel? I got me one for the RF 5b, but unfortunately never had time to test it before the glider turned into a repair project. Neat with a small display unit with a wire to the box that you can place anywhere you want, also it's low power consumption is a plus.
http://www.trig-avionics.com/index.html

May the 4's be with you/ Jörgen
[Edit by Jorgen on Monday, March 14, 2011 @ 09:10 AM]
Posted by dannparks on Monday, March 14, 2011 @ 02:02 PM:
Yes, I may end up moving the compass. I noticed that the folks who moved their compass above the panel have removed the glare shield. I want to retain the shield (especially with the light-colored panel) and I don't think a compass will work on top of it without really getting in the way. Anyway, who really looks at the compass with GPS? 
I have been looking at the Trig transponder. A nice package with built-in encoder and a low-profile face plate. It would be great if they had a radio to match. Let us know how it works when you get it flying.
--------------------
Dann Parks • RF4D #4051 N2188 • now flying!
Pictures at: https://picasaweb.google.com/111628310900713778468/RF4D_N2188?noredirect=1
Posted by jb92563 on Thursday, March 24, 2011 @ 07:52 PM:
Nice work Dan.
I like the light color as it really makes the guages stand out.
Brightens the cockpit nicely too.
--------------------
Ray
RF4D #4057 N-1771 Rectimo 1400cc
http://picasaweb.google.com/jb92563/FournierRF4D
http://www.touringmotorgliders.org
Posted by Collin on Friday, March 25, 2011 @ 12:26 PM:
The RF5B has the compass on the glare shield. My RF4 had the compass on the glare shield mounted low.
Posted by D. Porter on Wednesday, February 6, 2013 @ 07:44 PM:
I want to add coaming above my panel to shield the gps a bit. I didn't even realize mine was missing until I saw some panel photos of other 4's.
I like your idea about the black poster board and I found that exact product at an art supply store. Any chance you could post a picture or give me any details on how you attached the coaming?
First I cut a cardboard template to fit exactly as the original did, that's below the ply top-decking on both sides, but above it in the middle. Then I modified this as necessary by trimming or adding masking tape where needed, then I marked & cut out the final shape on the black stuff.
I'm sorry I can't show you a photo, because I'm currently confined to bed with back trouble (caused by lifting my Fournier's tail and pulling it backwards too far and too often!)
If you look at some of the cokpit-camera footage taken from my British Fournier (red airplane, red shirt) you might get a good idea.