
Bucker restoration resources
- Written by: Administrator
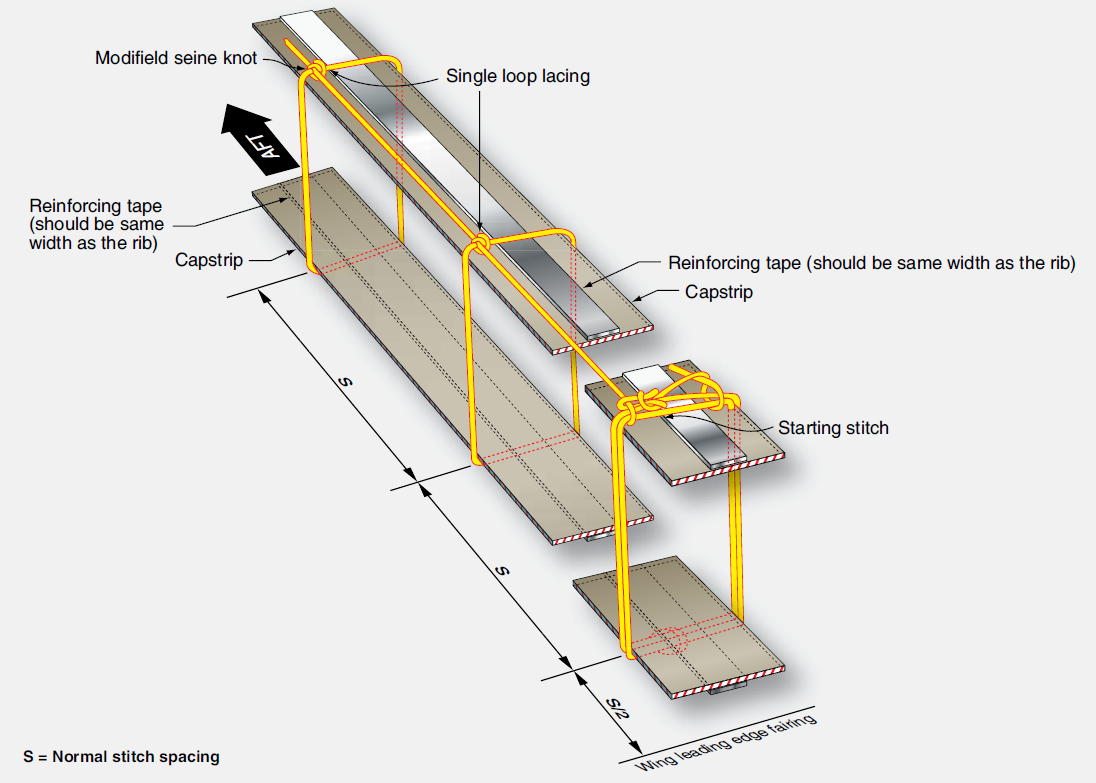
In rib lacing the rib cap-strips are wrapped in fabric tape and the covering fabric sewn to that tape. The stitches are much smaller and the reinforcing tape narrower.
There are several methods used to make the stitches one of which is known as "German two-needle" or "Focke-Wulf" stitching. After the fabric is shrunk a pencil line is drawn along the center of each underlying rib, then two lengths of thread are prepared each with its own curved needle. Alternating stitches are then made along the length of the pencil line first with one needle, then the other. This results in a neat, even stitch which can then be covered by a narrow (+/- 3cm) finishing tape.

(side view)
Another method used in Europe is the Swiss "Z' stitch in which a single needle is used to make a stitch across the rib starting from the same side and finishing with a knot on the opposide side each time. Between each stitch the thread remains on top of the fabric and crosses to the starting side, creating the distinctive "Z" appearance.

(Rib seen from above)
- Written by: Stephen Beaver
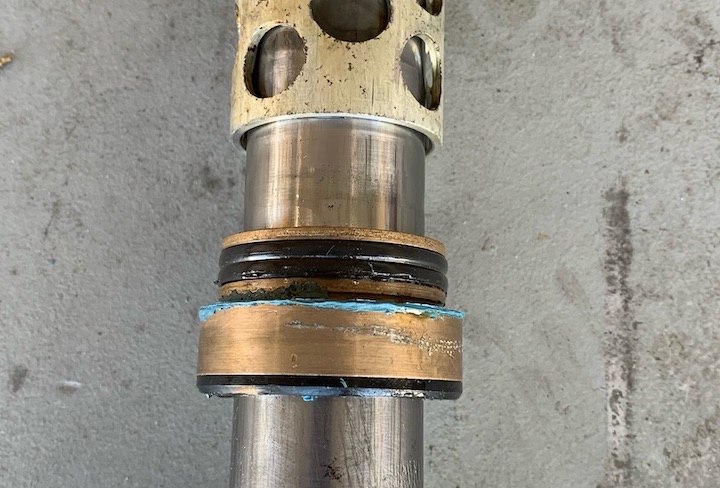
This is the landing gear seal assembly from the lower end of a Jungmann gear strut. This particular assembly was modified by Mark Reninger and features (unusually) double O-rings and a lower seal retainer.
Here is the same thing, cleaned up and disassembled to show the seal, retainer and (for comparrison) an Honda fork seal as used in the assemblies modified by Woody Menear.
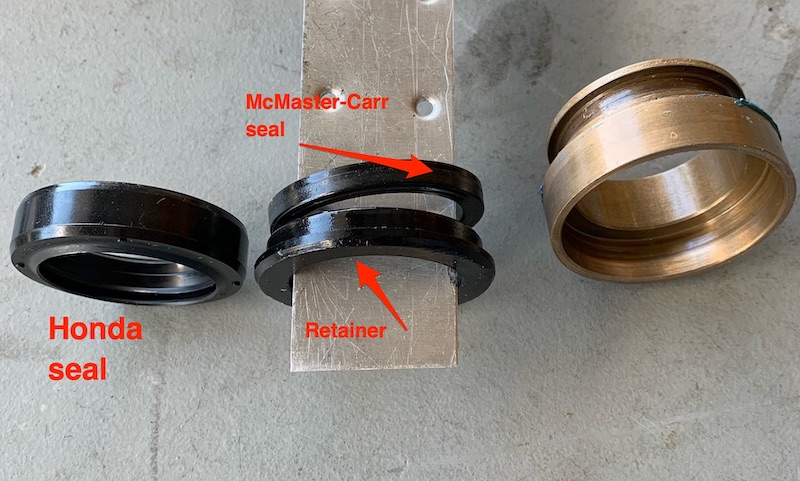
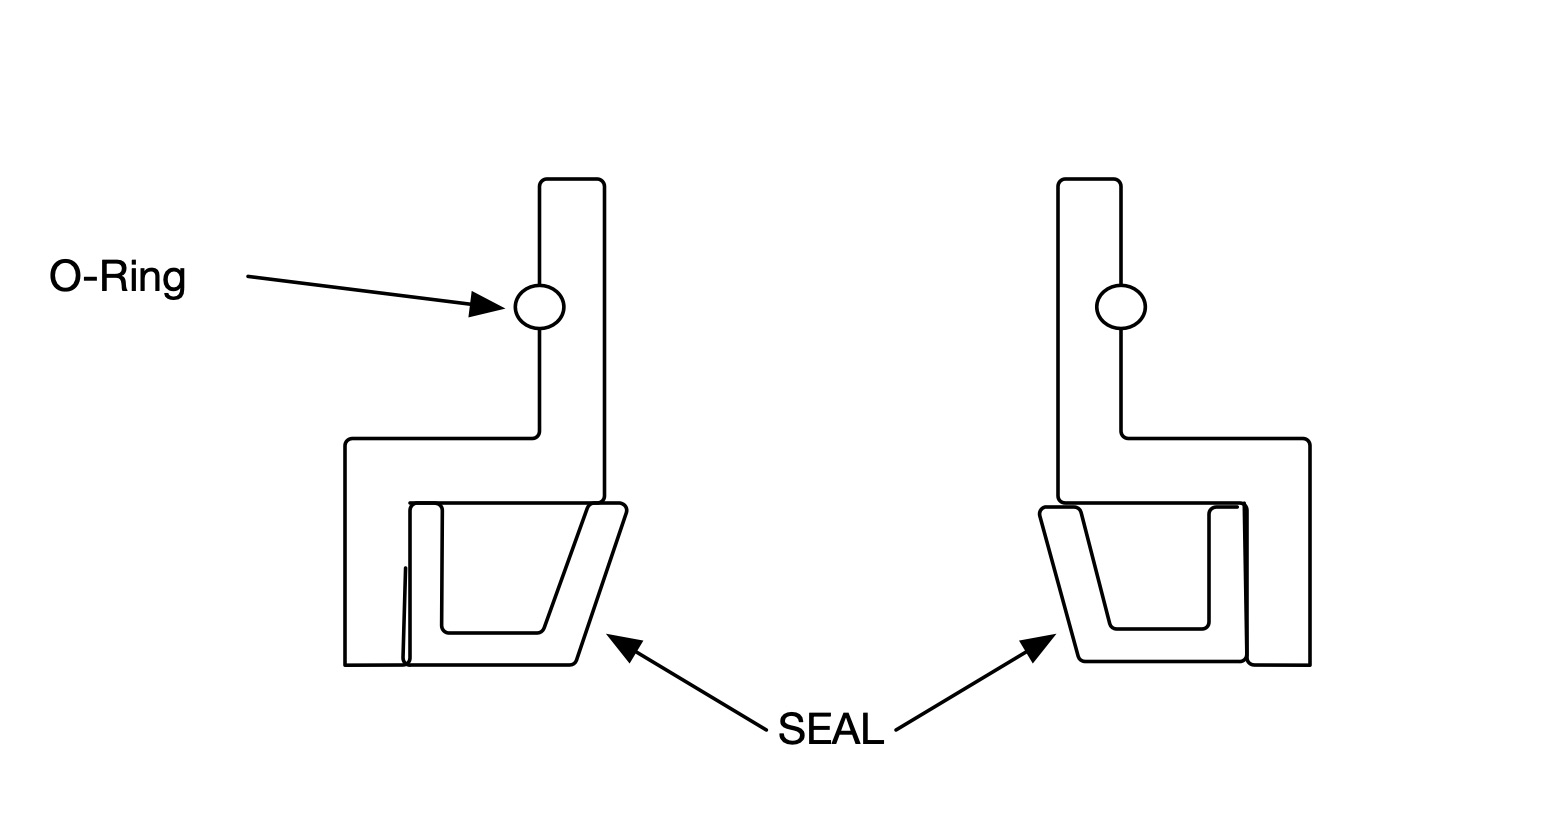
This is what a typical seal assembly looks like of the type favored by an Original CASA aircraft, a Joe Krybus conversion or a Woody Menear conversion.
The O-ring is typically an AN568-221 although it is not unusual to require a slightly smaller size. It is is tight fit and Vasoline is your friend when installing. My aircraft required a -219 O-ring. The exact seal dimensions/source depends on how/if the gear has been updated. These are some typical values:
For Joe Krybus gear legs the seals are 47mm OD x 35mm ID x 7mm thick. Part number S35x47x72MP low pressure seal from Metrics Seals inc Westfileld Indiana is a good fit. +1-317-896-3555
For Menear gear seals, a Honda motor cycle fork seal is used. The part number is 91255-292-003. These can be found on-line or through your local Honda dealer.
The gear legs modernized by Mark Reninger (who worked with Woody Menear for a while) use a thinner seal held in place by a plastic retainer and feature double O-rings.

The seal comes from McMaster-Carr and is their part number 9595K55 https://www.mcmaster.com/catalog/9505K55
A lesson I learned the hard way is that when installing the seal assembly on the strut, the threads at the top of the leg must be protected with suitable tape. Failing to do this will result in the treads damaging the inside surface of the seal and a leak is then pretty much guaranteed!
- Written by: Administrator
You can send them an original, a drawing, or you can do the whole thing by email. Place the gasket in question on your flat-bed scanner and place a piece of graphpaper on top. (You can download a page of graphpaper from their website.) The scanned image will look like this:

Now email the image to http://gasketstogo.com/ at the address they provide on their website and you will receive a quote. It was less than $3 for the valve cover gasket shown above. (Silicone rubber/cork, 3mm thick)
If you accept the quote, the gaskets are made and mailed, and you pay by credit card from a PayPal invoice. From the little research I did it would appear that the service is reliable and customers are pleased with their work.
If you accept the quote, the gaskets are made and mailed, and you pay by credit card from a PayPal invoice. From the little research I did it would appear that the service is reliable and customers are pleased with their work.

- Written by: Miklos Schermer Voest
I found a F 16 helmet,custom silicon In EAR Plugs with CEP speakers ( or foam earplugs ) and an option for a microphone mask the best way to communicate,as well as being a head protection .The helmet alone still gave resonance from the airflow around my head ( propeller generated )
I use a Becker radio,AR 6201
Possibly this is of use to friends in the Bucker and open cockpit community.
Miklos Schermer Voest


- Written by: Administrator

To download a copy, visit the "Downloads", "Misc" section of the website, or click on the sample above.
Thanks Gary. Again, I am amazed by the time and skill people bring to bear on material submitted for our collective benefit.
- Written by: Administrator
Visit the Downloads section and look in "Manuals, or click on the image below.

- Written by: Administrator

Registered website users can click this link to download the book:
http://www.bucker.info/index.php?option=com_docman&task=doc_download&gid=44&Itemid=67
It is quite a large download, but well worth it. While Bucker Prado SA were active in supplying Bucker parts, they would use this book as a guide. The page shown above is page 4/41 so a part would be identified by that page number and then the item number from the drawing. Still a good way to define a particular component.
- Written by: Administrator

I have placed full-sized scans of the decals in the Gallery within the "Markings" section.
- Written by: Administrator
You may have seen pictures of Dirk's work on this website, particularly his careful Hirth engine restorations.
Dirk currently has a number of restored Tigres for sale, as well as a Siemnes BRAMO SH14
- Written by: Administrator
This has to be the best value in all of Bückerdom. Hank Galpin has for many years distributed a booklet he wrote called "Tips and techniques for Bücker Wing Builders." The booklet is very well written and illustrated with good quality pictures. It takes you step-by-step through the process of building Bücker wings and ailerons. The booklet has recently been expanded to include a section by Joe Krybus on building the ailerons.
To obtain a copy, send $10.00 (For non USA addresses, a $20 bill please) to:

Hank Galpin
1885 Stillwater Rd
Kalispell, MT 59901
Hank's email address is
(This scan is very low resolution, the real thing is of good quality)
- Written by: Administrator
One such item was a model aircraft auto-pilot made from the electro-static sensor in a smoke detector. How exciting - except that there were no smoke detectors to be had in English hardware stores, and comparitively few hardware stores to begin with.
Years later, Burt Rutan designed the fabulous Quickie. 100+ mph on a 16 HP Onan lawn tractor engine. - Lawn tractors and engines which of course you can't buy in England.
Now that I live here in the land of omni-present hardware stores, and near infinaite availability, the shoe is on the other foot. - One of my favorite resources is the McMaster-Carr company. www.mcmaster.com - This company is amazing. It seems there is nothing you cannot find in their catalog somewhere. From Toilets to aircraft grade metric hardware, from tampon dispensers to earth movers - it's all in that thick yellow book somewhere.
The latest treasure I found between the covers is self-adhesive, 0.012" thick Polyethelene tape. This stuff is great to apply to your cockpit doors, side panels, cowling or fuel tank, and will prevent chaffing, scraping or fabric damage. The adhesive is super strong, but the tape itself is as slippery and strong as PTFE or Teflon.
Click this link http://www.mcmaster.com/#catalog/116/3414/=8r00ac and scroll down to the "Strong and Slippery UHMW Polyethylene Tape with Super-Bond Adhesive" item. I used part number 7344A31 - Highly recommended!
Times have changed, and now there is not such a big difference between what is available in Europe, and what can be found in the US (except for Baguettes and chocolate eclairs, unfortunately). None the less, if you are reading this from Europe, Asia , or elsewhere, and need help buying something from an American supplier, just email and I will help.
- Written by: Garry Allen
I compared these drawings of the basic airframe to a partial set of factory drawings (only the flying surfaces) and the full scale owned by my friend, Matt Chapman. The result was that I found them not to be very accurate. Since I needed an accurate set of drawings for Matt's and my project, two 35% models of the Spanish built Bucker Jungmann, I undertook to produce an accurate set. I used Matt's factory drawings, and his full scale (uncovered) as reference. I used ModelCAD, a relatively simple 2D CAD program.

Since I intend to finish my model as EC-FUU, owned and operated by Fundacio Parc Aeronautic de Catalunya in Barcelona, I send my drawings to their director, Peter Argila, to be authenticated. He submitted them to the Technical Department. They found the drawings to be accurate, and provided me with a really nice Certificate of Authenticity.
So, I would like to make these drawings available to everyone in the Bucker community. Accordingly, I have attached them as a PDF file to this note.
Best Regards,
Gary Allen
------0------
Thank you so much to Gary for this drawing. I know there are many people who will be thrilled to have access to such acurate information. Please click the picture above, or HERE to download the full drawing in PDF format.Steve