- Written by: Administrator
The "Landing gear" link at left now does just that.
- Written by: Steve Hawley
A good friend and a good airplane!
I was introduced to the Bucker community by accident back in 1984. I was renting a hanger at the Avra Valley Airport which is about 10 miles NW of Tucson, AZ. A fellow behind my Tee hanger had a Super Decathalon and a funny looking fuselage of a plane in his hanger. We became acquainted and he told me it was a Bucker Jungman and the wings and tail were in his home shop.I had heard of that type of plane but had never actually seen one. Looked it over and was not impressed. Our friendship developed for a couple of years and we both bought hangers at Ryan Airfield, about 15 miles south of where we had met. His name was Maurice Davidson and he had bought the Bucker from Bill Barber out of Michigan and had it flown to Tucson by a ferry pilot. According to the log books Maurice flew the plane one time for a few minutes then disassembled the plane because the fabric would not pass inspection at Annual. Maurice had a lot of money but he was NOT mechanically inclined. He had contracted lung cancer when quite young and had only one lung and it wasn’t very good. He asked me if I would recover his plane and get it flying again.
My “hobby” is/was restoring antique and classic airplanes, I had already done four or five by this time, and I said sure! He also wanted me to install removable aluminum side panels from the firewall to the back of the rear seat so he could access the two cockpit areas more easily. Again I said, sure, because the plane was registered in the experimental category and FAA approval would not be required for the alterations. By the way, I had picked up an A&P certificate and IA some time prior.
My first discovery that the Bucker was “different” from American built airplanes was my welding a finger patch over a large dent in the main spar carry-through in the bottom of the fuselage. It is roughly a 1”X4” rectangular tube and as I discovered, very thin compared to what I was used to. I burned several holes in the thin wall before I learned the technique. One day as I was working on his plane he showed up with four sheets of engineering paper filled with very small calculations and equations. Now I have a degree in Civil Engineering and remembered enough to recognize diferential equations and calculations using the calculus. I asked him what in the world is this. He said it was a mathematical description of the compound curve of the fuselage between the firewall and to the rear of the back seat, needed for the removable side panel.
I need now to tell a little about Maurice. He is probably the only true genius I have ever met or worked with. He graduated from MIT with a degree in electrical engineering and a doctorate in geophysical engineering from Columbia. He was also a veteran of the Korean War. He worked all his life for Neumont Mining searching all over the world for gold and diamonds. Sometime, I think it was in the late ‘60s, the CIA borrowed him from Neumont Mining to develop an airborne magnetometer to locate a sunken Soviet diesel powered submarine that carried the latest ICBMs somewhere about 700 miles NW of Hawaii. That along with Howard Hughe’s Glomer Explorer was at least partially successful. He was not only a genius, he was easy to be friends with.
I completed the removable side panels, didn’t (couldn’t) use his calculations, and was just about ready to start covering when he got sick and had to go into the hospital. My wife and I visited him in the hospital and on the way home my wife told me that Maurice was not going to make it. She was an RN working in Cardiac Critical Care and knew the signs. I didn’t believe it but she was right. I visited him often and have this amusing story of when he was in the hospital . One night for whatever reason, he pushed the call button for his nurse. No one came. He waited a few minutes and tried again. Same result. After a while he held it down for a full minute. Same thing. He dialed 911! You can bet his call button was answer after that!
Sometime prior to his hospitalization he asked me to be the executor of his “airplane things and tools”, not his financial estate thank goodness. I Agreed to do it. In his will he allowed me to buy the Bucker project at 20% below the market value. This put me in a difficult position because I had to determine the “market value”. There was a large pile of correspondence in the box of paperwork and I figured out that a man named Joe Krybus in Santa Paula, California was the man who might be able to help me. I sent him some pictures and a letter asking for his help. He had me send more pictures but declined to establish any value on the engine, avionics, or Propeller. No problem, the value of those things was easily determined from TRADE-A-Plane. I ended up buying the project for $19,000. Now you must understand I had absolutely no interest in owning an airplane that was cold to fly in the winter, hot in the summer, and to slow to travel anywhere. I speak from experience because I learned to fly in a Waco UPF-7 back in 1954. My plan was to complete the restoration and sell it. Toward that end I decided to haul the project about 700 miles to the Bucker Fly In in Santa Paula.
The plane at this point was ready for cover, center section mounted, engine and prop (Hartzell Constant Speed) mounted and all the tail section with controls hooked up. I borrowed a truck and trailer and away we went. My intent was to allow as many Bucker owners to see the quality of the restoration as possible. I let it be known that I would put it up for sale when it was completed and flown for 10 hours. At that time I did not place a price on it for the simple reason I didn’t know how much I would have in it when done. When I completed the covering I decided to finish it in bright colors (all biplanes should be yellow!) and a basic Czhekoslavokian Air Force scheme. The plane was actually a Czech built C-104. I had never flown a Bucker before but what the heck, it was a primary trainer and couldn’t be very hard! I climbed in and away I went. Flew it for about 30 minutes and all my thoughts about selling it vanished! As far as I am concerned it is indeed the finest flying airplane ever designed! I was hooked and still am. Even better than the flying qualities of the design is the people who make up the Bucker Community. There are none better!!! I flew N191X for 19 years and then in a moment of weakness sold it in January of ‘18.
Another Bucker!
My first epistle ended with my sale of Bucker Jungman, N191X in January of 2018.Sometime after I moved from Tucson to South Carolina to be near our grandchildren, I received a call from a man looking for a Bucker Jungman who lived in Charleston, about 2 hours south of me. His name was John Grinalds, a retired Major General, USMC. I invited him to meet me at a small airport called Dry Swamp and we would talk and he could look over the plane. I made certain he understood that mine was not for sale. We met as planned, got acquainted, and soon became friends. I invited him to taxi the plane around the field and just see how it felt. He did and the experience strengthened his desire to own one. A year or so later he found one, out in Southern California that was for sale from the estate of the late Myra Slovak. The deal was made and I agreed to go out and fly it back to SC.
Myra had planned on flying his Jungman to Germany and had added three fuel tanks for the required range. I don’t remember what the total fuel capacity was and during my trip East I never put fuel in the tank behind the rear seat but I know the duration was determined by my bladder, not the fuel. The plane was equipped with a 200hp Lycoming engine. Myra had installed an auto pilot but that had been removed prior to the sale to John. John Hickman very graciously met me at the San Diego airport and we flew in his Blue Jungman up to Falmouth to where the Slovak plane was located. We put enough fuel in the main (original) tank and I followed him back to San Diego. There we put about another 50 gallons or so in the auxiliary tanks and the next morning I headed East.
I made sure I was within gliding distance of an airport the first time I switched tanks! Everything went well and two days later I was home removing tanks. It was really nice having another Bucker in the area. A couple of times when John had other commitments and could not fly his Bucker to the East Coast Bucker fly in I called my friend Pat Quinn and he would come East and fly mine and I would fly John’s. But then, January 2018, I sold my plane. A couple of months later John sold his.
I’m sure John felt the same, I knew I had made a mistake. I am always involved in a restoration project and in the meantime had purchased a wrecked Cessna 140. I had been working on it for a month or so when a Bucker Jungman project was offered for sale on the Bucker forum. I called John and asked him if he would like to go 50-50 and we restore another Jungman. Is the Pope Catholic? John said YES. I think he actually mailed a “good faith” check that very day! In any case we bought N131DR, a souped up but disassembled Spanish built Jungman.
Another irrelevant but interesting fact is that when the airplane was imported to the US it was stored in PA, in or near a little town called Farmers Pride. Whatever, it was near where a young lad named Brian Karli, aged 12, lived. He told us he sat in our plane for hours dreaming of the day! The plane was eventually purchased by Dawson Ransom who had it restored by Woody Menear. It won some kind of award at Oshkosh in 1983. For some reason when the plane was restored, grade A cotton fabric was used instead of the more durable Stits or Ceconite. The plane went through a couple of owners and eventually ended up with the Martin family of Green Bay, Wisconsin. Dennis Martin told us he was out flying doing some aerobatic practice when a good portion of the fuselage fabric failed. The plane was barely controllable but he was able to land the plane without to much damage. He said he had to maintain at least 75mph to stay in control and it is a good thing they have a long beautiful green runway. Mr. Martin ordered a new landing gear including Cleveland wheels and brakes from Joe Krybus and started the restoration process. Unfortunately his health failed and Dennis and his mom put the plane up for sale. I have a trailer I bought just for hauling airplanes, borrowed my son’s diesel powered truck and John and a neighbor and I headed north to Green Bay to load our new project. This was July 29, 2018.
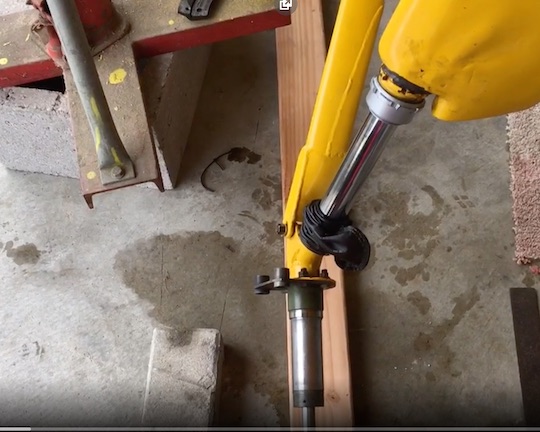
Structurally the plane was in pretty good condition but badly in need of a total restoration. I told John that with the two of us working it would take one year to have the plane flying. I was off by almost one month, we flew the plane all decked out in Swiss Air Force colors a little less than 13 months later. We noticed very early that the plane was more difficult to push around by hand than we remembered our first ones to be. In fact, it was nearly impossible for one person to move the plane when on grass. We keep the plane at the Holly Hill airport which is midway between us and both runways are grass. The only time we land on pavement is when we go somewhere. We both agreed that something was not right and needed to be fixed. To check the wheel alignment I clamped a couple of straight 1” X 4” X 6’ boards to the brake rotors and was appalled at what I found. The wheels were splayed out like a ruptured duck! Over the years the compression springs in each gear leg had relaxed to the point that only 1” of chromed gear leg was visible, plus, someone in the past had “extended” the spreader bars to 31” from the original designed 29.5”.
We decided to fix several problems, all in one work session. We agreed to shorten the spreader bars back to the original 29.5”, correct the wheel alignment to where the wheels were absolutely parallel with the centerline of the airframe when the tailwheel was 12” above the concrete, and install a “spacer” on the top of each gear leg spring to take up the void caused by their relaxation. All of this would bring the nose of the plane back to its regal attitude. I estimated this project would take about a week of concentrated effort and I was right on the money! I borrowed a set of jacks with a crossbar made to fit the jack points on the Bucker from Brian Karli, we live about a 4 hour drive from each other. Jacked the plane up to where the wheels were able to turn and set the tail of the plane on a stool to where the tail wheel was 12” above the concrete.
Two problems were very obvious. The jacks extended to that point were very “wobbly” and the plane tended to slide backwards because of the angle of the fuselage to the ground. I removed the spinner, prop, and ring gear and used a double wrapped 1/2” nylon rope around the crankshaft just aft of the prop flange and used my hydraulic engine hoist to assist and stabilize the jacks. Seemed to do the job very well and I felt much more comfortable with the “double” safety measure. The problem of the plane sliding backwards was solved by installing a 5/16” anchor bolt about 6’ forward of the tailwheel on the center line, using some scrap length of 1/4” chain and a cheap hardware store turnbuckle to attach to the tailwheel and the problem was solved. No more sliding backwards.
At this point a very careful measurement of the “slack” that had developed by the landing gear springs relaxation was measured. Both gear legs indicated a void of 1.00” as measured by allowing the axle to “bump” the bottom (leg fully extended) and lifting it to “bump” the spring against the top gear leg nut using all the muscle available to me, maybe 50 pounds. I found in my junk steel bin about 14” of 1.75” X 0.125” of 4130 chromoly bushing stock. I think it was left over from when I replaced the tailwheel mounting tube in the rebuild of my first Jungman. In any case it was exactly what I needed. I carefully polished the o/s of about 4” of the tube and then cut two spacers out on the lathe exactly 1.05” long. It was a good guess because when I reassembled the gear legs after all the work was complete I could just barely catch the first thread on the bottom gear leg nut.
Now the spreader bars and wheel alignment. The paint was removed from the lower end of each spreader bar and the cut marks carefully made. A 4” portable grinder with 1/16” cutoff wheels was used to “disassemble” the lower end of each bar. Exactly 1.5” of the lower end was removed from each bar and the “bevel” on the leg similar to the original configuration was made to each. The two sides with the bolt holes, the saddle strap, and end plug of each leg was cleaned up and made ready for re-welding. A jig was fabricated to hold the two axles exactly in alignment and perpendicular to the centerline of the fuselage.
I happened to have a 10’ piece of 1.5”X1.5” X 1/8” square steel tubing on hand so I didn’t even have to go to the store to buy any. Each gear leg was held in position so that “4 fingers” of chrome (3”) was allowed to show. Each leg was held in this position with wood blocks and a wedge to preclude the leg extending and a hose clamp was installed temporarily at the top of the visible chrome to preclude the gear from being inadvertently pushed up into the strut. It was now time to fabricate the jig. Two 4 1/2” pieces were cutoff of the 10’ stick of square tubing and clamped to the axles with a cardboard cushion between to protect the axle threads. The long piece was then clamped to the two pieces held against and parallel to the axles and all pieces carefully centered. The axles and gear legs were wrapped with wet towels and the two short pieces were tack welded to the long piece. The two short pieces are necessary to clear the flange welded onto the gear leg just inboard of the axle that the brake system is bolted to.
I was now ready to install the shortened spreader bars and tack weld all the pieces together. One spreader bar with the end plug welded back onto the lower end was mounted to the top fixture using the original bolt that has a grease fitting. The lower end assembly was installed using the original bolt that also has a grease fitting. The two fittings made for handy and accurate measurement.
The front plate, the saddle strap, and the rear plate were all clamped into position using a large spring clamp. The bottom bolt was tested using a wrench to insure everything was in position without any undue stress that would rear its ugly head after finish welding. The distance between the two grease fittings was checked and double checked to 29.5”. Everything was protected with wet towels and aluminum shields and then the lower assembly was tack welded together with four good welds, two on the top and two on the bottom, each side, a total of eight.
I use acetylene/oxygen for much of my welding for the simple reason I have much more experience and confidence in it. I have a top of the line Miller TIG system and use it for aluminum and stainless steel but prefer the former when I use mild or chromoly steel.
The spreader bars were then removed, taken into my shop, and welded to completion. When I reinstalled the bars after welding, a few minutes with a very fine round file was necessary for the two main bottom bolts to slide in and out with hand pressure. No hammer required or allowed!! All the paint was then removed from the bars using the grinder equipped with a twisted wire brush, primed with automotive epoxy primer, and finished with the Stits Federal Yellow urathane.
Everything went back together with no major problems. The plane rolls much easier on the concrete and the ground handling while landing or taking off is straight forward Bucker, in other words, perfect!
Landing gear images
- Written by: Administrator
- Written by: Charlie Miller
His response exceeded my expectation. Charlie wrote this wonderful tutorial about building Bucker landing gear. It shows step by step how to check your landing gear alignment and how to fix the alignment if it doesn't line up.
We are fortunate to have people like Charlie in the Bucker community. He insisted I share his landing gear information with everyone and graciously allowed his tutorial to be published. My friend is following Charlie's advice and will soon have a straight and nice handling Jungmann gear.
Thanks Charlie.
Brian Karli
Check the alignment of the gear
- Lift the aircraft up and let the gear extend fully.
- Take off the bolt at the lower end of both spreader bars.
- Insert a short bolt into forward hole of the spreader bar to hold the right spread distance.
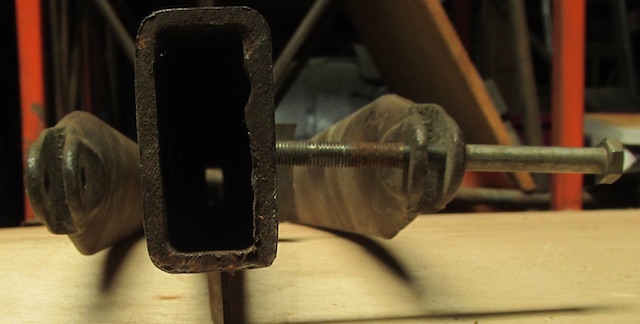
- With the brakes removed (best way) or left on using a large square or rectangle piece of tubing (bar stock) use a hose clamp to attach the tube(bar) to the axel.
- Now get a very straight angle iron (I use a 2x2x3/8 angle) long enough to go across both gear and clamp it to the axle/tube. Doesn't matter if the fuselage is in the three-point landing or level flying attitude.
- If you can, see if the hole on the back side of the lower part of the spreader bar is aligned. If it is then remove the short bolt and put in the long bolt.
If the gear is not aligned
If you can't push in the bolt then the rear lower part of the spreader bar must be removed and re-welded in alignment, or the bolt hole welded closed and re-welded. Then re-drilled.Note: I tack the lower parts of the spreader bar on with all gear items installed, this is the last step of building a new gear. Each aircraft will have distorted from welding and I feel to get good tracking I like to do the final assembly and welding on the fuselage.
How to align the gear
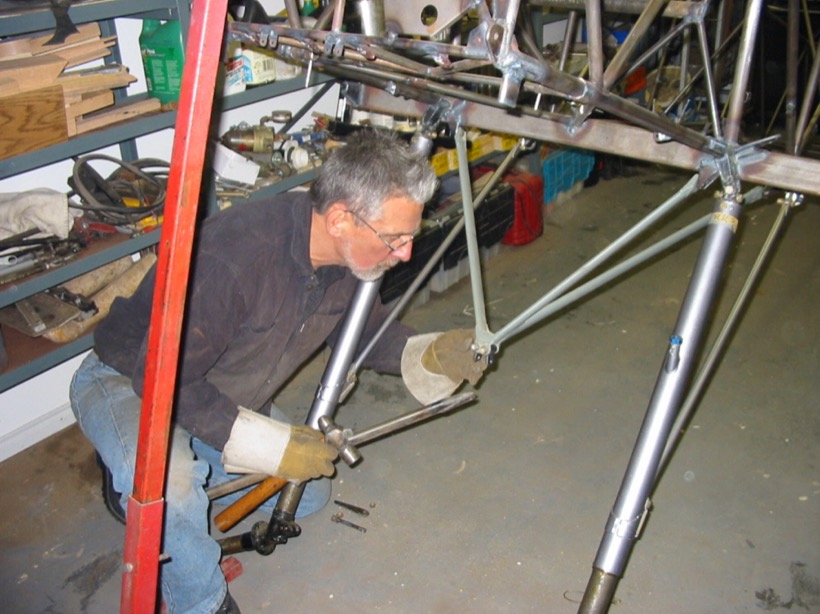
1. Fit the link between the tripod and the fully welded upper part of the spreader bar.
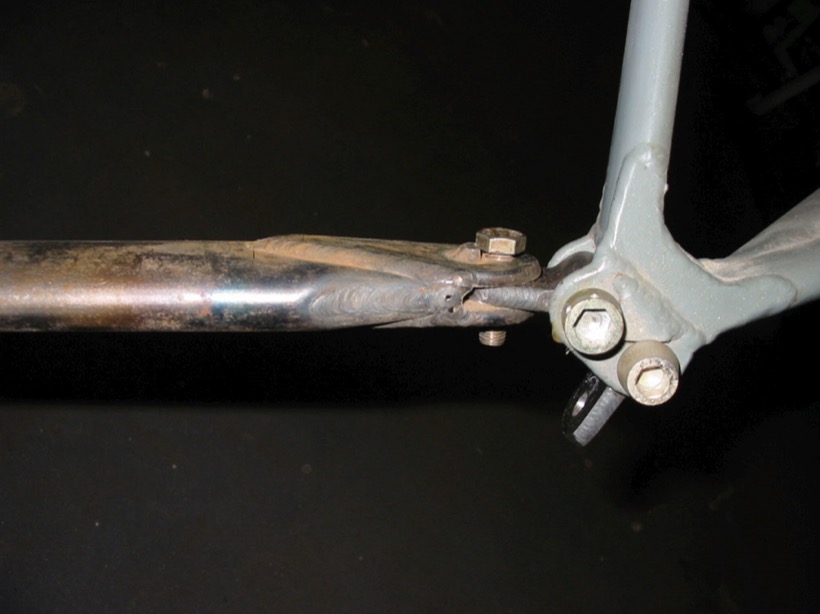
2. Link assembled with assembly bolts.
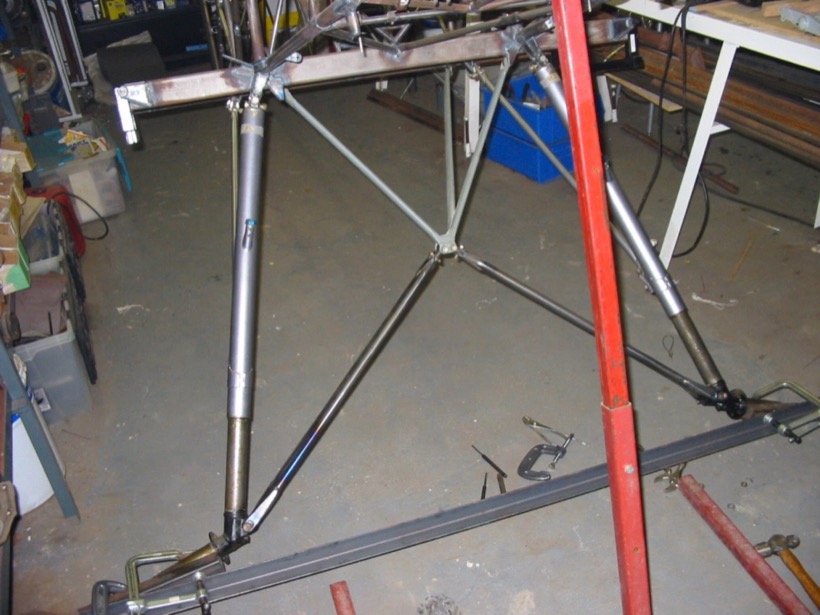
3. Alignment jig with finished spreader bars.
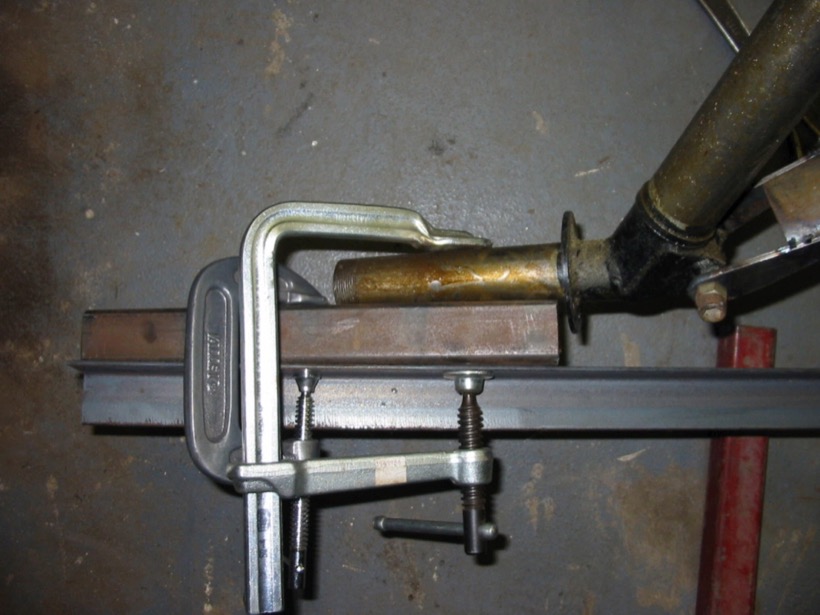
4. Tube spacer clamped to axel and angle clamped to tube.
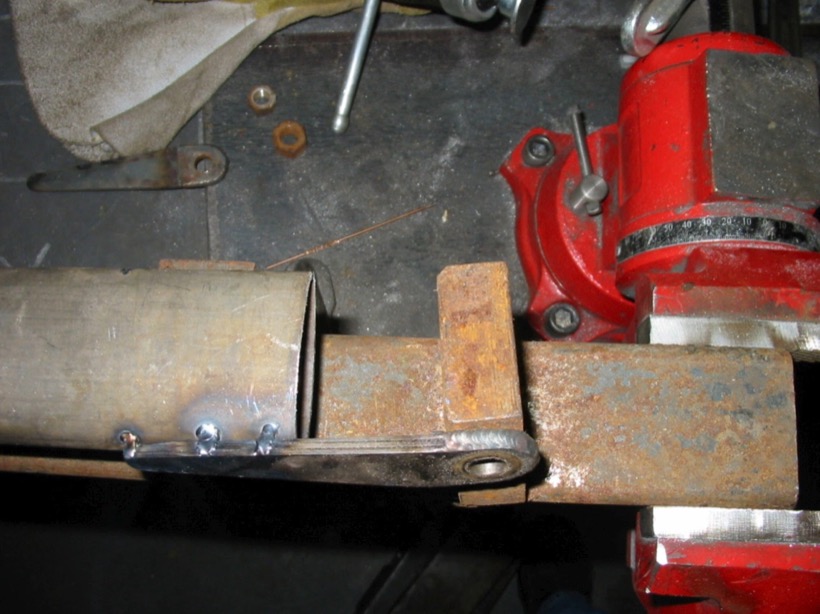
5. First finger attached to streamlined tube
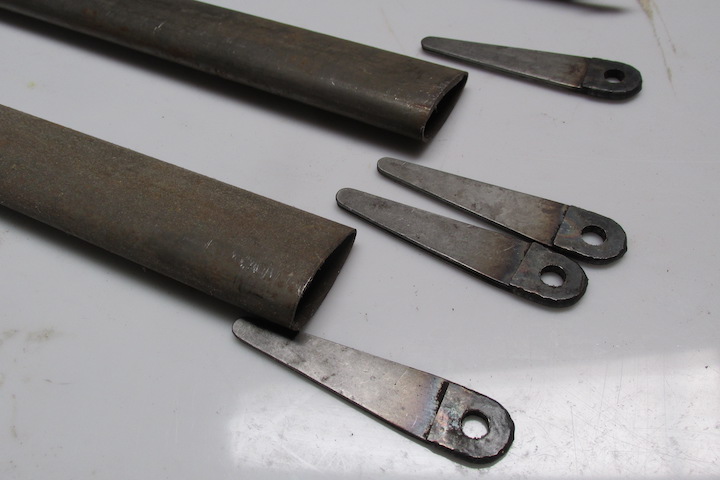
Note that the three long pieces of each finger and the short tab are all welded then the bend is made to fit the streamline tubing. Leave the rest of the finger unwelded or tacked until it fits the tube or you will put stresses into the lamination.
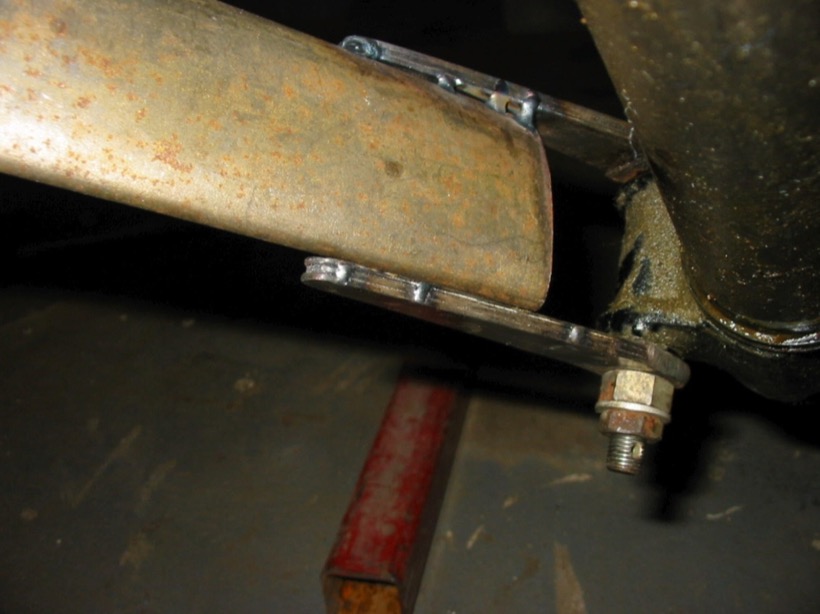
6. Rear finger ready for tacking
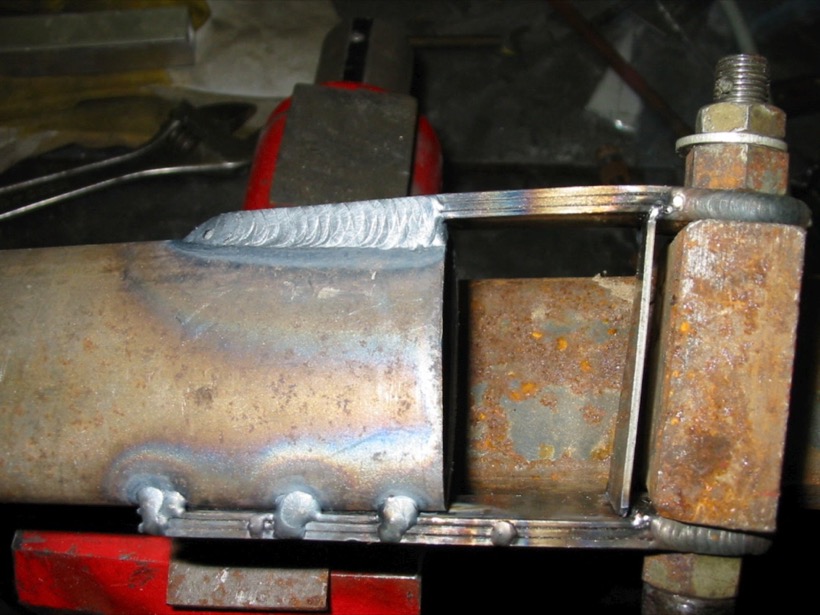
7. Forward side welded and cross brace tacked in
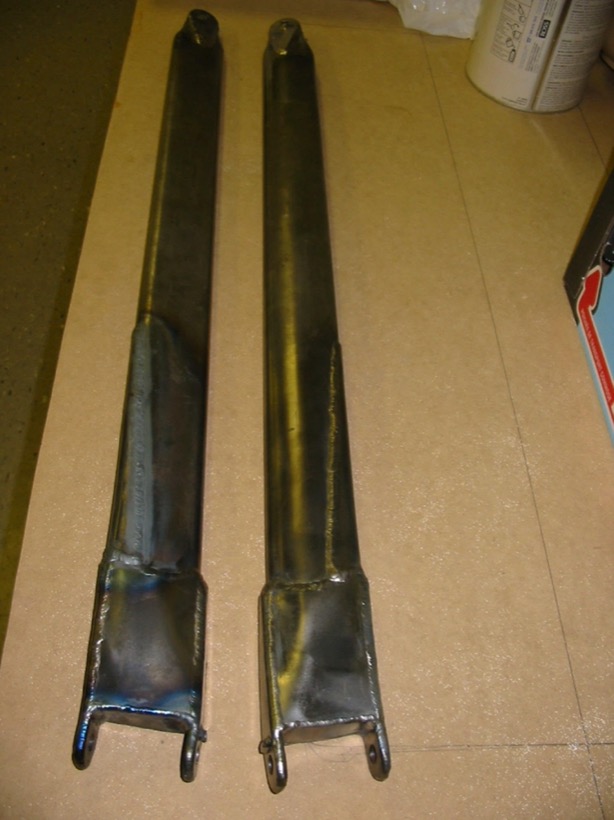
8. Finished Spreader bar Jungman or Jungmeister
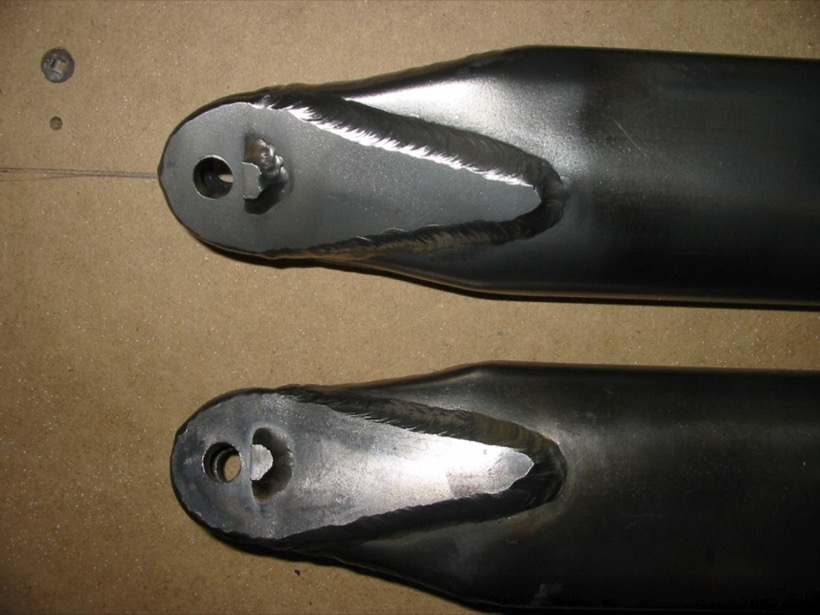
9. Finished upper spreader
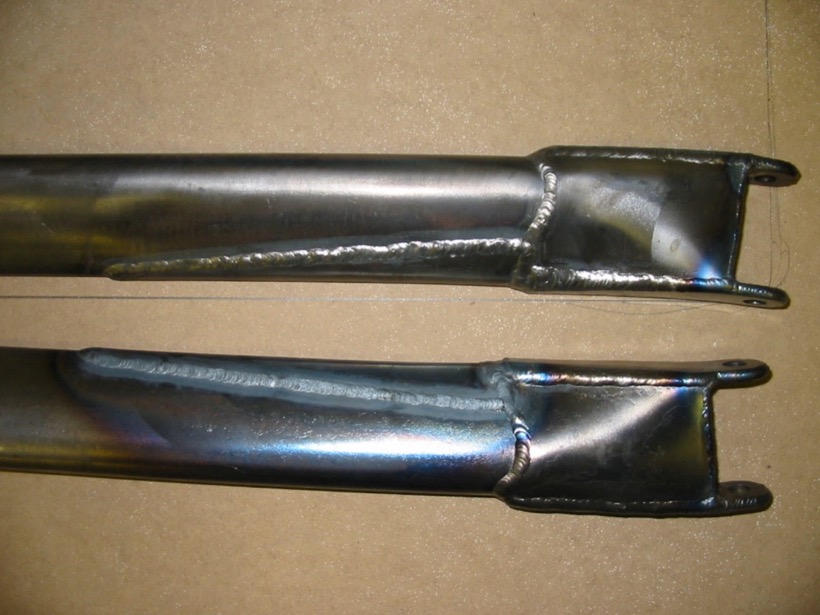
10. Finished Lower spreader
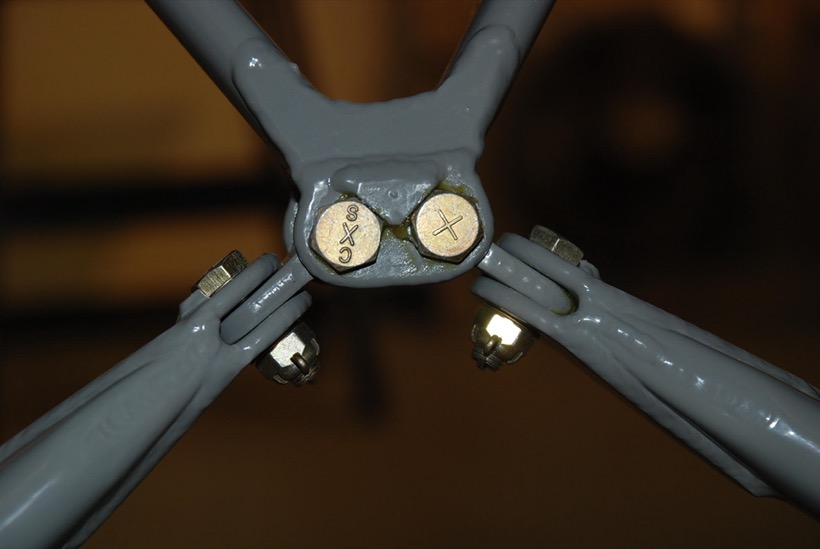
11. Painted and final assembly
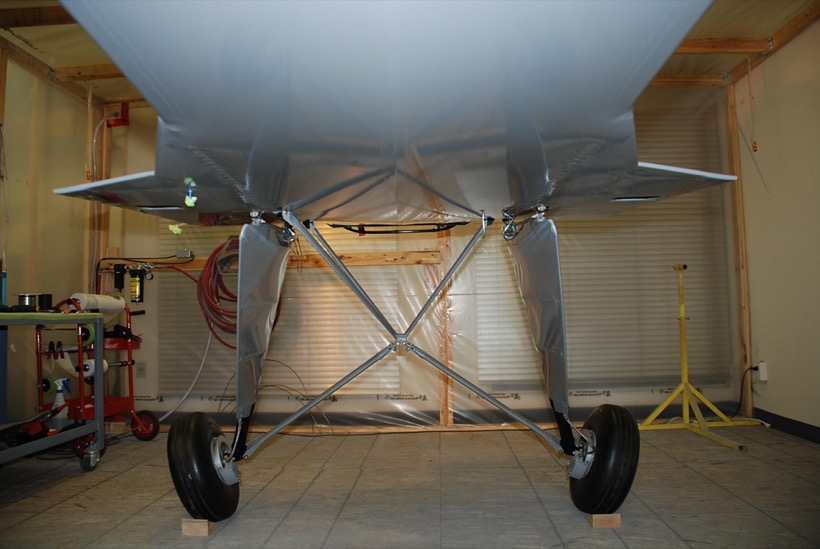
12. bottom side
Notes on making Spreader Bars
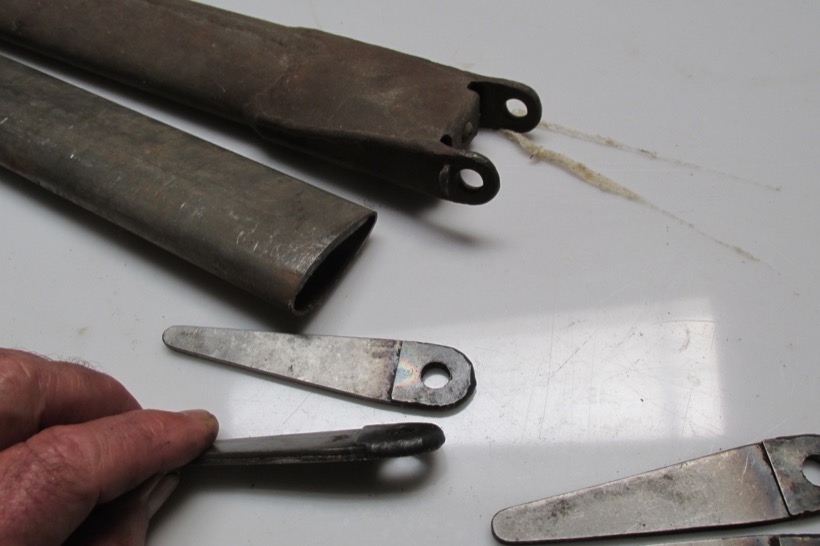
Edge weld all four pieces together. Drill hole and ream to size
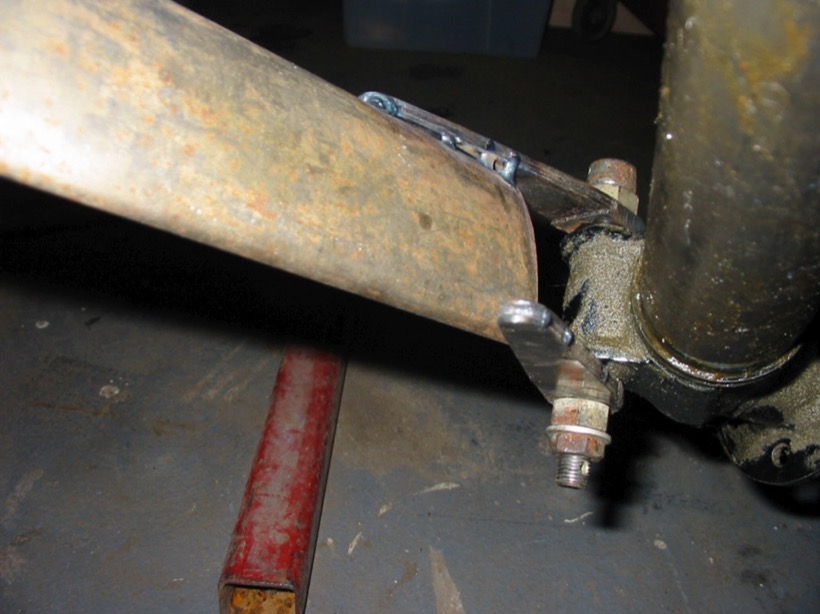
Cold bend with a good radius the three pieces next to the thinner inside piece to fit tube
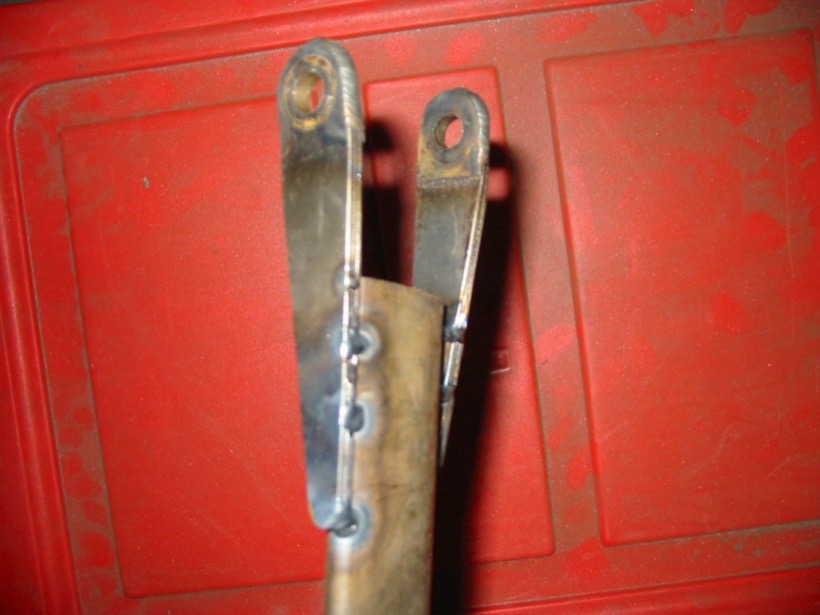
Tack both parts on both sides
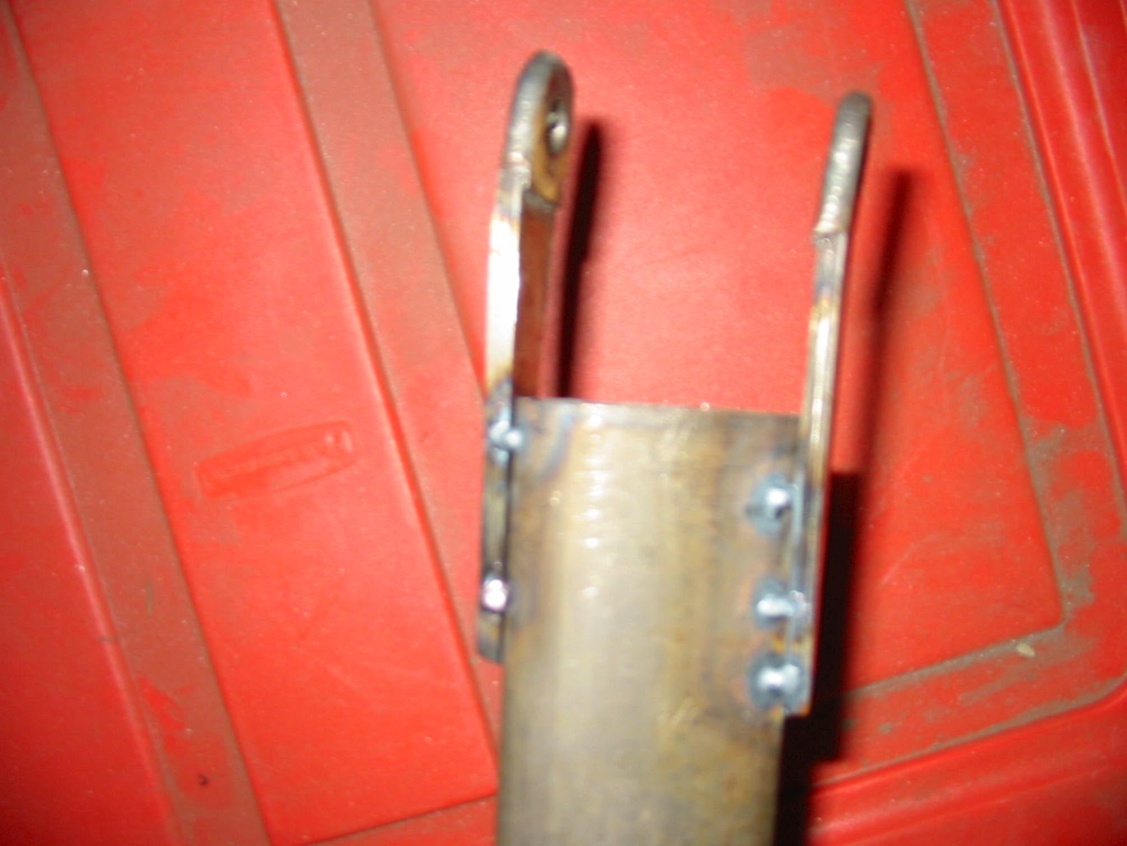
Note the bend on the fingers
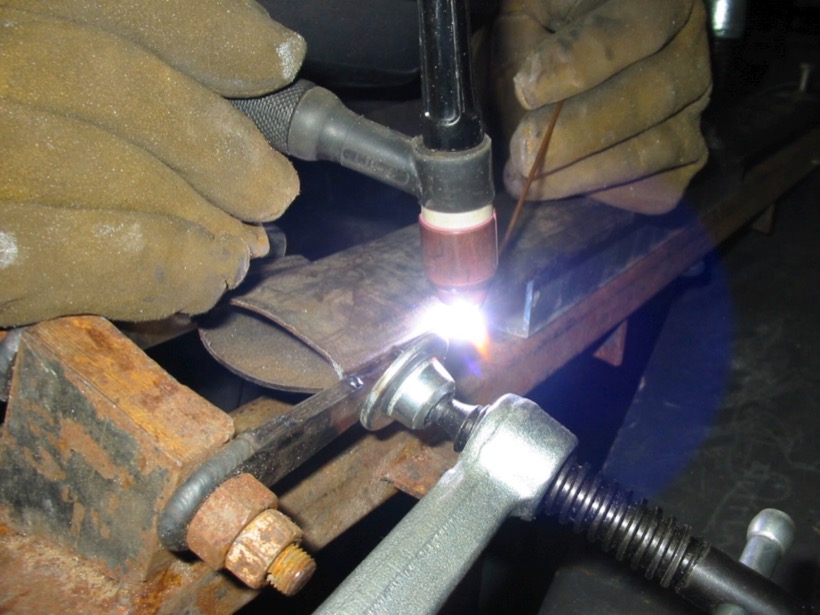
Put a spacer between the two fingers and secure with a bolt
Weld the space first then a fill and cap pass
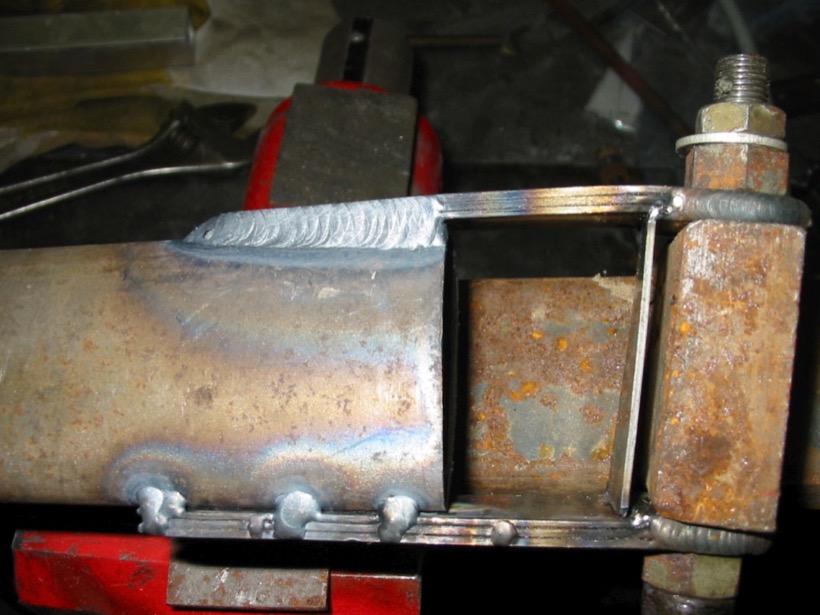
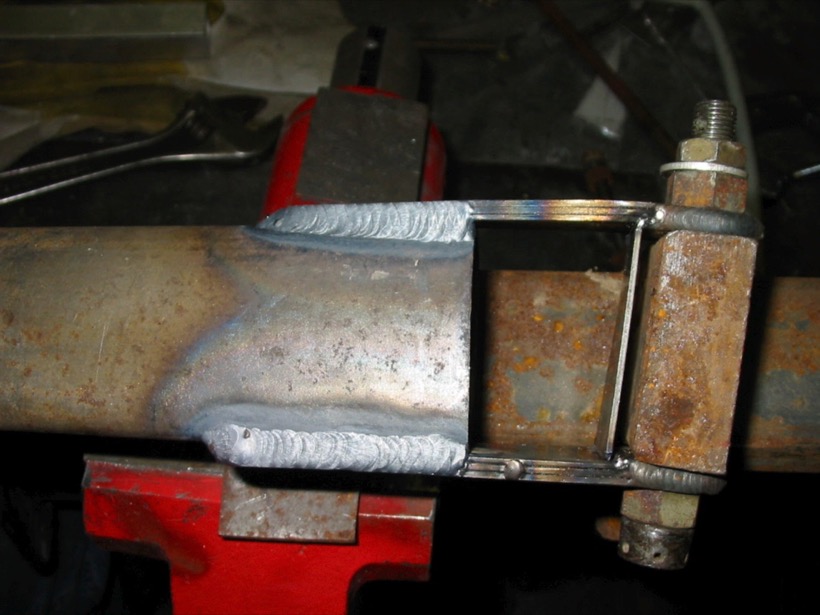
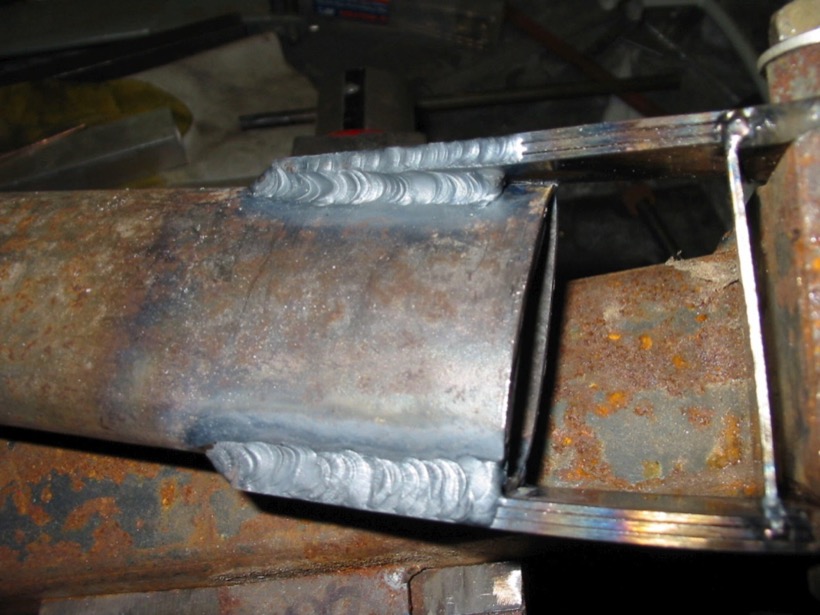
Finished weld now just add the sheet in-between heat to bend the sheet in place
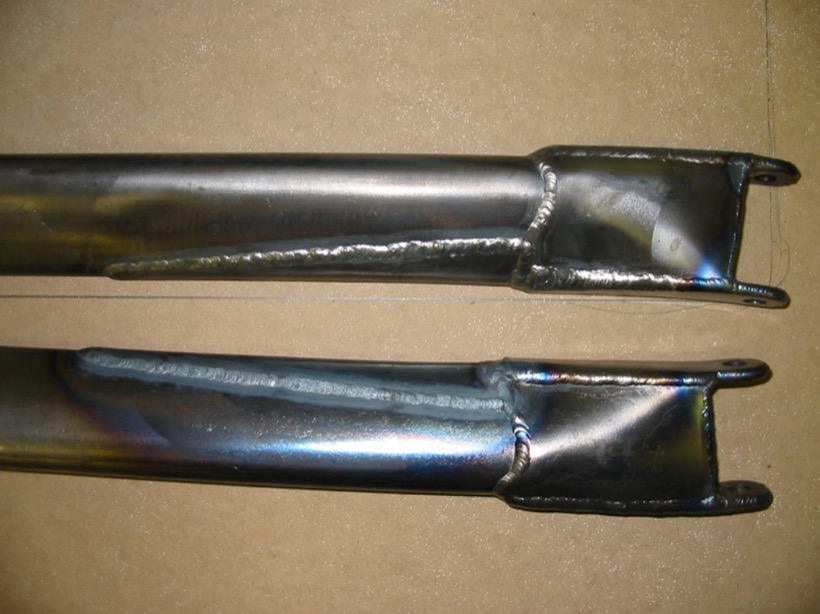
Final welds showing the curve in the filler plate to keep from having a straight line that could cause cracking. Then form and weld in place the trailing edge reinforcement.
Why are the fingers of the lower part of the spreader bars made laminated?
- Steel when roll formed gets a grain direction.
- Like a piece of wood, steel will crack or break and is weaker across the grain direction than along it.
- If you look at a piece of 4130 sheet stock it will have the type of steel, the heat or batch and heat treatment stenciled on the surface in the direction of rolling also known as direction of grain,
- A piece of plywood is strong in both directions and a piece of spar quality spruce is strong with the grain but not across the grain.
- The wooden spars on a Bucker are laminated and the grain direction is shifted to keep any grains from aligning so a crack in one part will not transfer to the next.
- The fingers of the spreader bar take lots of flexing loads so having the grains slightly angled to each other make them stronger and less likely to crack across the part
- look at the welded parts that make up the cabane strut attachment and engine mount attachment on the fuselage. They are laminated, thick pieces to the center and thinner on both outsides. The thick piece goes down through the longeron and through the vertical and angled tubes. then is welded where it sticks through and the thinner pieces get welded to the top part of the longeron upper side of the tube.
- The fuselage flying wire attach point is three thicknesses edge welded and then welded to the steel spar and to the longerons.
- When I cut parts off the original plate/sheet and I create some usable scrap, I use a permanent marker to show the direction of grain. This helps to use the scrap material in the correct grain direction.
- When bending material, having the grain direction the correct way, the material won't crack along the grain boundary.
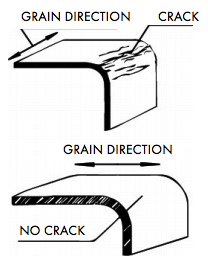
- Written by: Administrator


and Dave Stillinger shared this:
I have been challenged by some landing stability problems and often wondered what specifications/adjustments are in order to gain the best results when on the wheels. I’m not sure I can answer that, but I have some observations on toe in/toe out to pass along.
Never had much issue with my Jungmann of 10 years as the previous owners apparently had everything up to snuff and it seemed to track fine. I purchased my Jungmeister 5 years ago and that thing was possessed on ANY landing. Very unstable and took tons of footwork to keep it rolling anywhere near straight. So began my investigations into toe in/toe out issues.
Luckily for me I have access to several Jungmanns and John Hickman’s beautiful Jungmeister here at Gillespie field to refer to and measure.
Your article eloquently shows how complex the geometry behaves and thus firstly the need for a common way to infer where a particular wheel geometry is set.
Since I was measuring several aircraft I took the easy route. My definition of wheel toe angle is taken when the aircraft is sitting three point, on its wheels, full fuel, but no other loads.
I built a small jig that picks up the wheel rim, so tire variation would not affect measurements and the fenders could remain in place.
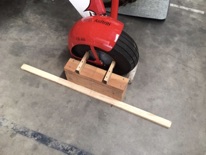
Degrees are calculated relative to the aircraft centerline.
I measured my two airplanes first:
- Jungmann- 0.9 degree tow out. Standard spreader bars (29.5 inches between mounting bolt C/L’s)
- Jungmeister- 1.3 degrees tow in. Standard spreader bars
Went to the other hangars and measured.
- John’s Jungmeister- 0 degrees tow. Standard spreader bars
- Jungmann #3- 1.3 degrees tow out, extended spreader bars (2 inch addition each side)
- Junmann #4- 1.5 degrees tow in, extended spreader bars ( 1 inch addition each side)
- Jungmann #5- 0.3 degrees tow in, standard spreader bars
I felt my Jungmeister had excessive tow in and that could be the potential problem. The discrepancy was in the landing gear tripod. Again measuring all the available units on site I discovered the location of the lower pivot joint on the tripod, where the spreader bars connect, was 1 inch further aft than any of the others, which were within a 1/8 inch of each other. That rotates the spreader bars and thus the wheels into an excessive tow in position. I had a new tripod built to spec and installed it.
This resulted in 1.1 degrees of tow out when measured using the jig.
The character of the airplane during the landing phase completely changed. Lands like the Jungmann and is quite well behaved.
So by my personal experience I believe toe in of the wheels, measured when the aircraft is sitting three point, is NOT GOOD. I think neutral is ideal, with a small degree of tow in/out acceptable. I don’t have extended spreader bars, but Jungmann # 4 seems to land OK with toe in using extended spreader bars. That I don’t understand other than the wider footprint of the main landing gear with less wheel caster may be helping. Damping, spring condition, spreader bar and tripod geometry, all obviously play a role in the dynamics. All I can say is a stock landing gear should be near neutral toe when in three point configuration and that some tow out is better than toe in!
It is interesting to look at the log books of my Jungmeister. It was with Albert Ruesch in his aerobatic club, then rebuilt and taken to Austria for their aerobatic club and then back to Switzerland. Probably most, if not all, of its flying was from grass runways. When it was sold to the USA it went to Idaho and was reassembled and flown off an asphalt runway. It was badly ground looped on its first landing and had to have its tail feathers reworked! It was put in a museum for many years and not flown again by those folks! It was purchased by a crop duster friend years later. He can fly anything off of any surface and he flew it without incident but not many times. I don’t know how often he was on grass or asphalt. I bought it and reassembled it at Gillespie field and flew it off of asphalt. That first landing was not fun. No crosswind and I still kissed the wingtip. I struggled with it for a few years and managed to keep it in one piece, but it took changing the toe in condition to a slight toe out to make it a more enjoyable airplane on asphalt.
Dave
- Written by: Administrator
It is a difficult subject in some ways. The human brain adapts so quickly that no matter how odd it might first appear, we soon get used to things and they become "normal". We often hear that Bückers are tricky to land, "but mine lands just fine." I suspect we get used to our own aircraft, we form a "muscle memory" and to some extent, our reactions become automatic.
But the landing gear on our Bückers is at the least "unconventional".
We will never know for sure what was in Anders Anderson's mind when he designed it, but there are certain things we can take a pretty good guess at. Perhaps the most basic is that the landing gear legs attach to the fuselage at the same points that the wing spars attach. This means that a separate reinforcement (hard point) is not required for the landing gear and so some weight is saved. A consequence of this is that to get the wheels in the correct location, the gear has to be angled forward quite a bit, giving the aircraft the look of an Eagle about to grab its prey, In my mind at least :)
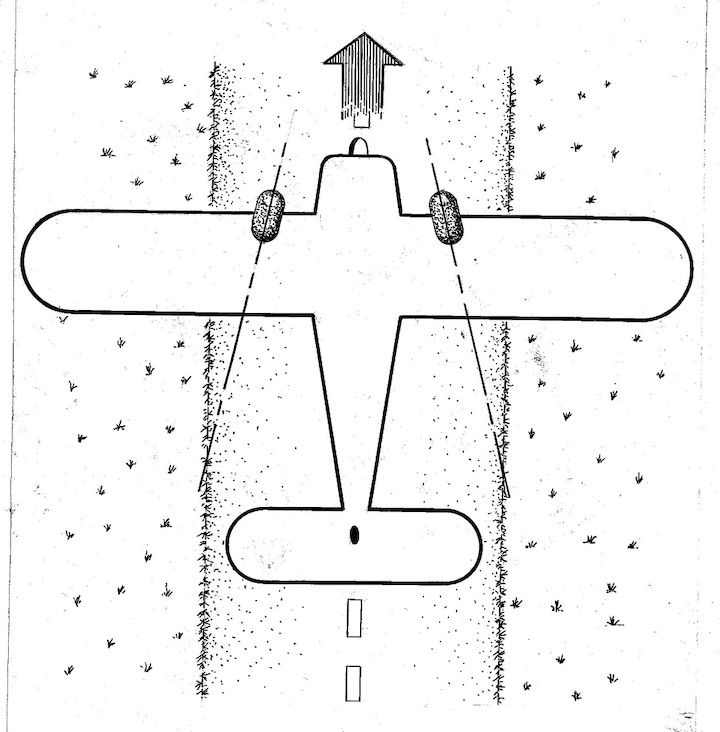
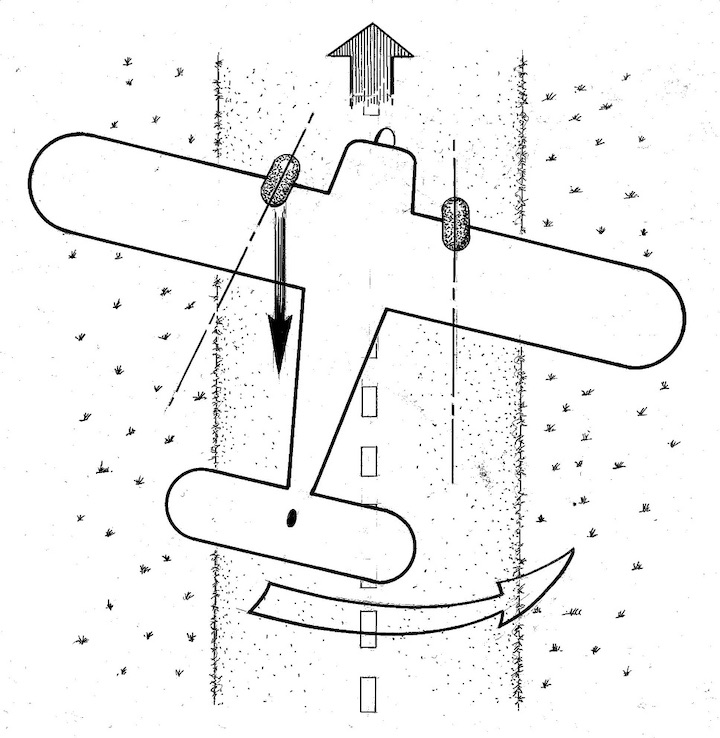
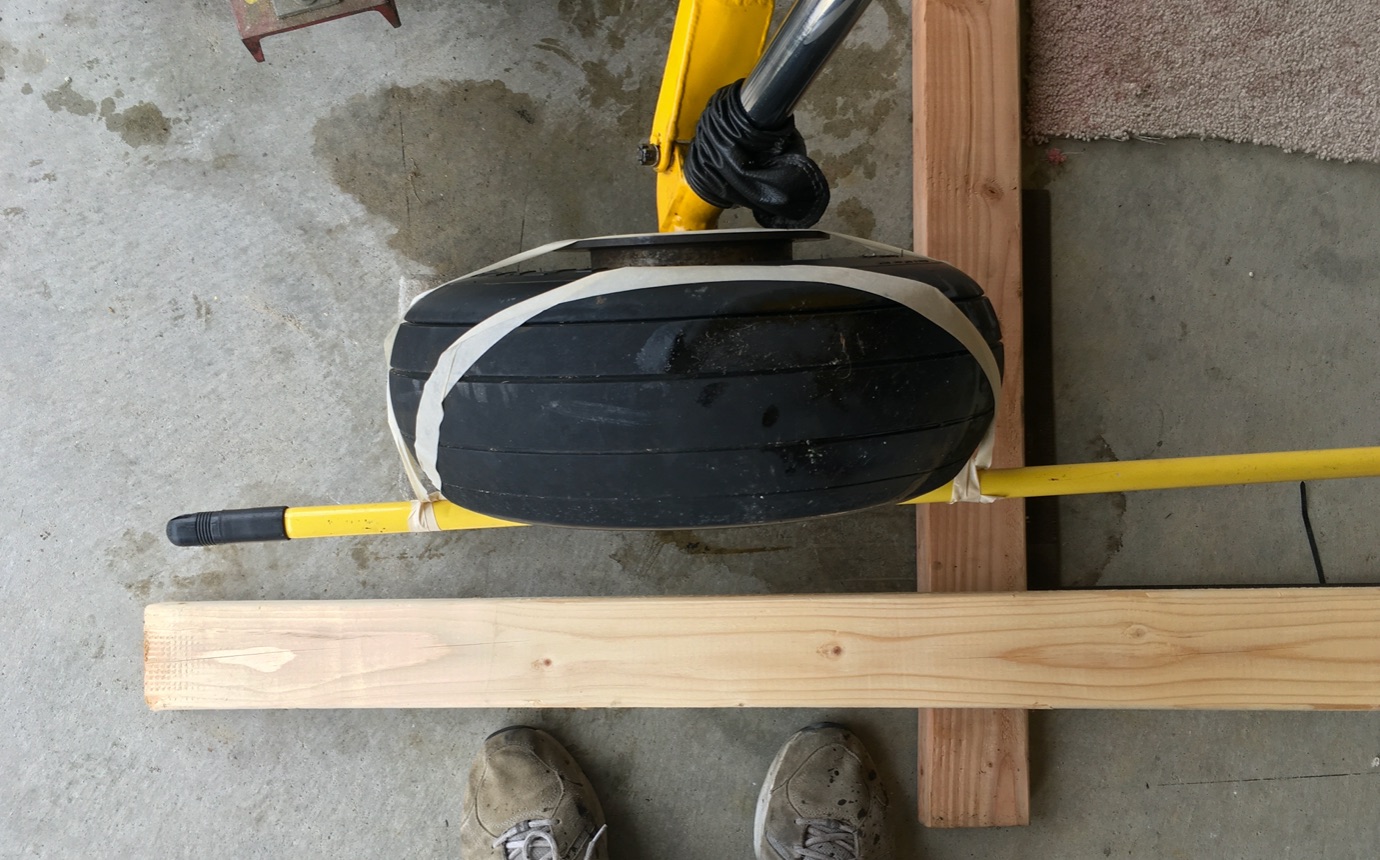
This makes the geometry of the landing gear quite complicated. When combined with the wheel camber (the way the wheels lean outwards) we end up with a very dynamic geometry. The toe-in/out in particular is constantly changing. Let's start with what happens when the tail is lifted: Hold you hands in front of your face like this and estimate the camber angle.

Now without changing that angle, rotate your hands forward so that you fingers are pointing away from you. - That camber has now become toe-out. The right hand is pointing to the right, the left hand to the left, and so it is with the landing gear.
Here is a picture of Greg Stringer's Jungmann on jacks and in a level attitude
And here it is again this time in a three point attitude.
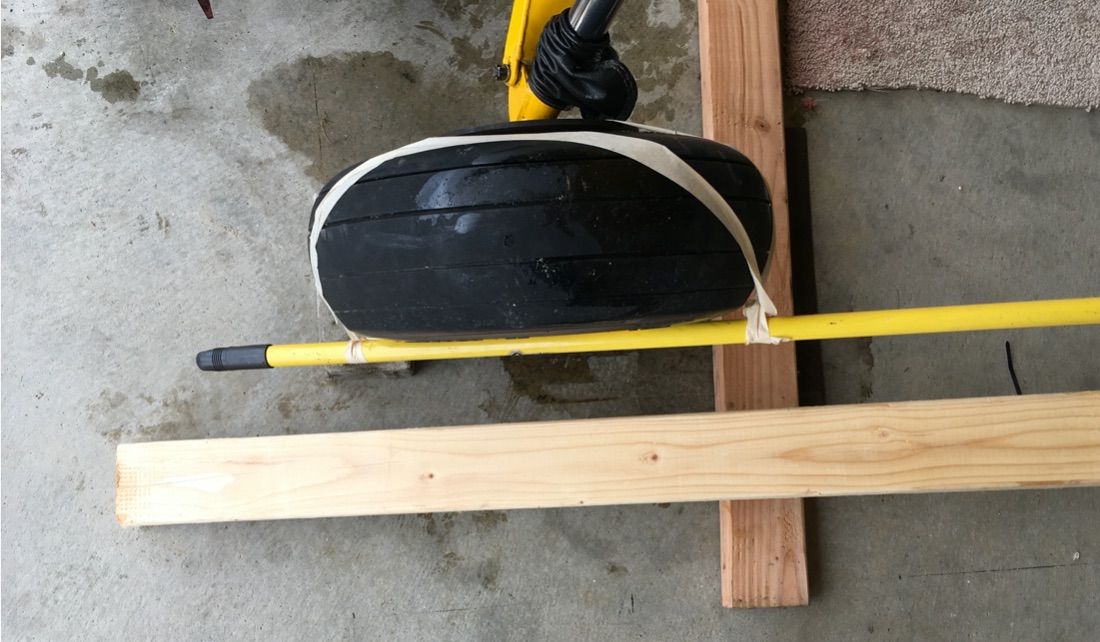
What else affects the toe-in/out? Perhaps surprisingly the gear extension does. This is more difficult to visualize, but the more weight is on the gear (the more it is compressed) the more toe-out the wheels will adopt. Similarly, the length of the spreader bar affects the toe. The longer the spreaders, the more toe-out you get.
I wonder if this is why some people say extended spreader bars help, while others say they do nothing. If your wheels have a little too much toe-in, extending he spreaders may correct that. If they do not, the longer bars will offer no improvement, and may even make things slightly worse. - I don't really know.
The reason for this change of angle with gear extension is the location of the tripod. Because the tip of the tripod, where the spreader bars attach, is located behind the wheels, the toe angle changes as the wheels move closer to or further away from the fuselage. If you don't believe that, try it in SolidWorks or AutoCAD and you will see.
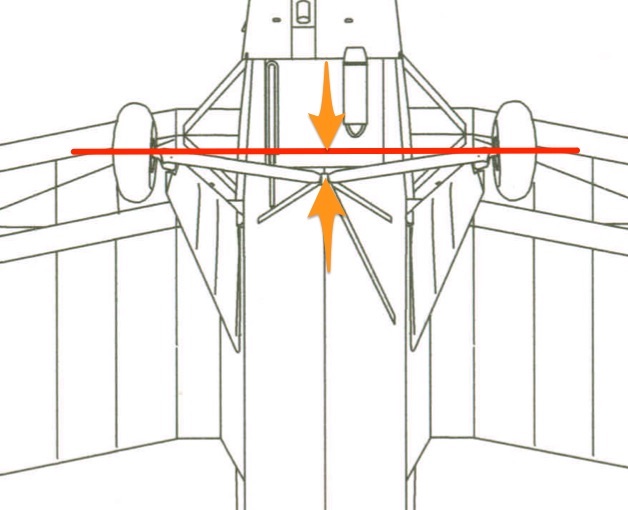
Gear extension is affected by aircraft weight and by the condition of the springs. If you have 75 year old springs and a heavy engine/prop combination, there may be excessive toe-out.
Greg made a great movie of the way the angles change when the gear extends. Click here or the mage below to watch it
So what is the "correct" angle for the wheels that will lead to the best handling experience? That is a tough question to answer. Google "tail dragger toe in toe out" and see what you get. Thousands of opinions and just about 50% favoring toe in and 50% toe out. Supposedly the Husky, Pitts and Cessna 100 series aircraft specify a slight toe-in but obviously a lot of people disagree. By now you will know that there are so many variables at play in the Bücker landing gear that it is almost impossible to say. But based on measurements I have made of quite a number of original (unmodified) aircraft, I would say that a toe-in of between 1.0 and 1.5 degrees with the airplane resting on its gear, tailwheel on the ground) is about right. - Cars typically have a slight toe-in. This is what provides the stability that causes the car to continue in a straight line when you remove your hands from the steering wheel.Is the same true in an aircraft. - Again, I don't know :)
The theory is that setting it to a slight toe-in in the hangar will cause it to become about neutral when the aircraft is loaded with pilot(s) and fuel and/or when the tail comes up.
But, and it is a big but, not everyone agrees with this. I know of at least two people who say no, the landing gear toe should be neutral or even slightly "out" to provide the optimum handling. To me this seems to indicate that perhaps it is not that important, and that you feet really will adapt to almost anything. Again though, the majority of "original" aircraft I have measured show 1.5 degrees or so of toe-in.
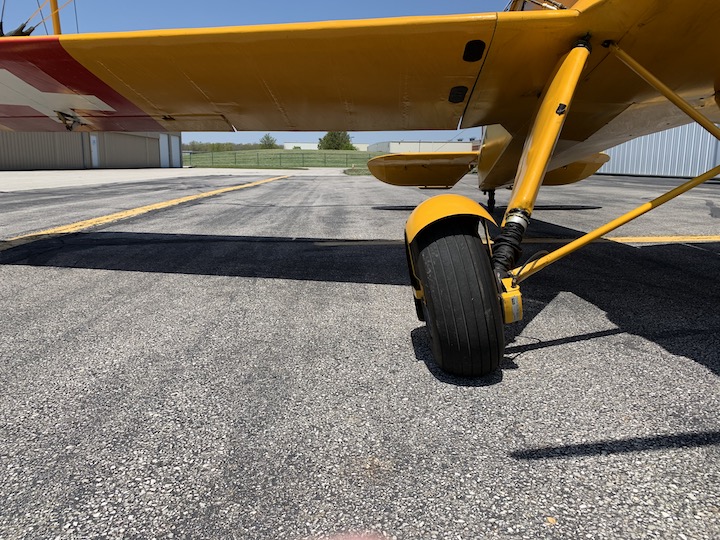
This angle is pretty easy to judge. Standing in front of the aircraft, sight down the outside of the tire towards the rear of the aircraft. If the angle is about right, your sight-line will intersect the horizontal stabilizer somewhere between the elevator hinge and the tip, like this:

This view shows how that looks (on N28Bü).
Enough about the angles - There is another factor which I think affects the way the aircraft handles on the ground and I think perhaps it is something we often neglect. Returning to the car analogy, one of the most important components in a car suspension is the shock absorber or damper (shocks and dampers are not exactly the same, but close enough for this discussion). If the dampers are worn, the car will bounce wildly when it encounters a bump and the tire may even lose contact with the ground. Aircraft have dampers too. Sometimes, as on the RV series of homebuilts, it may only be the sidewalls of the tire and the temper of the gear legs that provide the damping, but in the Bücker, we have a real oil-filled damper.
The cylindrical tube that forms the landing gear leg is filled with oil and on the end of the landing gear piston, a brass collar slides along the tube through that oil. There are two grooves in the brass piston which allow oil to flow past it at a specific rate to control the rebound, or bounce of the gear.
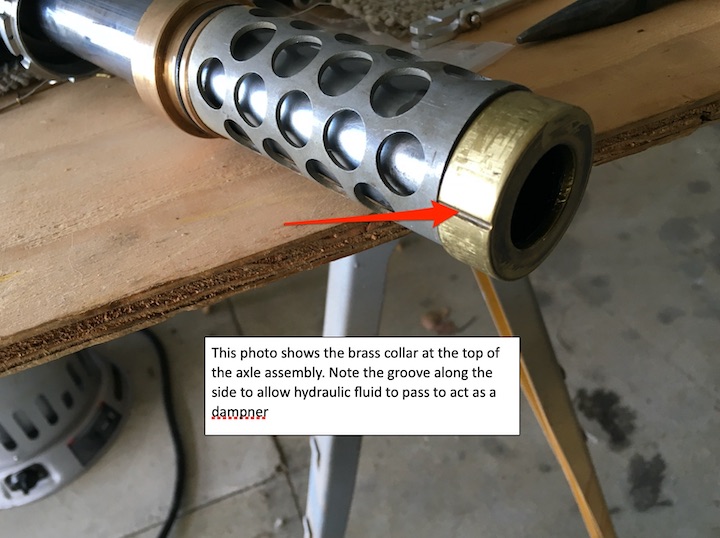
If the fluid level is low, the liquid too "thin" or the brass collar/piston worn, the damper cannot do its job and the gear will be springy/bouncy.
It is interesting that some restorers chrome plate the inside of the gear leg tube and measure the collar to ensure a snug fit, while others may be using 75+ year old gear legs in which a lot of fluid makes its way past the collar.
I also find it interesting that the landing gear that Charlie Miller makes is noticeably superior in a strong cross-wind, and Charlie pays particular attention to the damping. He shared this interesting link: http://www.hangar9aeroworks.com/Aeroncastrut/Aeroncastrut.html It demonstrates Aeronca "no bounce" gear rather than Bücker, but the principles are the same.
Charlie shared some interesting facts about the gear. He has often been called upon to repair landing gear components and spreader bars in particular. He says that on a number of occasions "pairs" of spreader bars had quite different bolt angles, or even different construction methods and he found it difficult to understand why. Talking to José Martin, the importer of so many of the CASA aircraft in the USA, Charlie learned that when a person bought an aircraft from José, they picked all of the required parts from piles of disassembled aircraft so that although they picked two spreader bars, they almost certainly didn't come from the same aircraft.
He also explained that when he built landing gear, whenever possible the spreader bars were finish welded only after being installed on the properly loaded aircraft. That way the correct geometry could be ensured.
Notice the bolt angle(s)
Please let me have your thoughts on this subject. I would love to learn more and publish any suggested corrections to the above.
- Written by: Administrator
I am often asked why the wheels on a Bücker lean outwards (camber) so much. I remember hearing (though I don't remember where) that it is to compensate for the angle of the gear legs, reducing the stresses on the landing gear. It was not obvious to me how this would work. Recently though I may have had an epiphany. I don't know why it has taken me so many years to realize this, but I believe that what is happening is that the weight of the aircraft causes the axles to want to bend upwards, but the camber causes a force in the opposite direction which partially cancel this out.
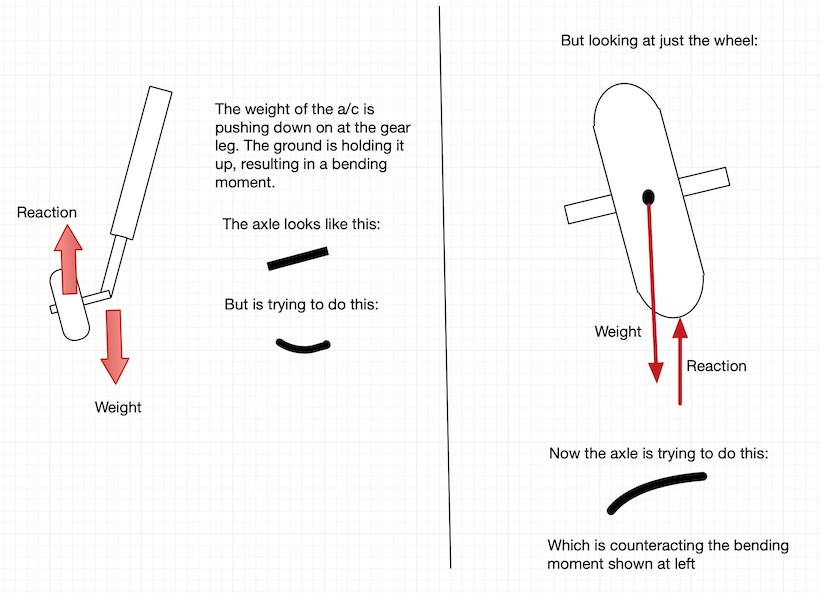
If the above is true (and I think we know Anderson well enough to say that everything he did was for a reason) the camber is helping to overcome what Jesus Ballester called "The Achilles heel of the Bücker". Is there any correlation between axle failure and wheel camber?
We have some extremely qualified aeronautical engineers in the Bücker community. What do you think? Is this reasonable?
- Written by: Administrator
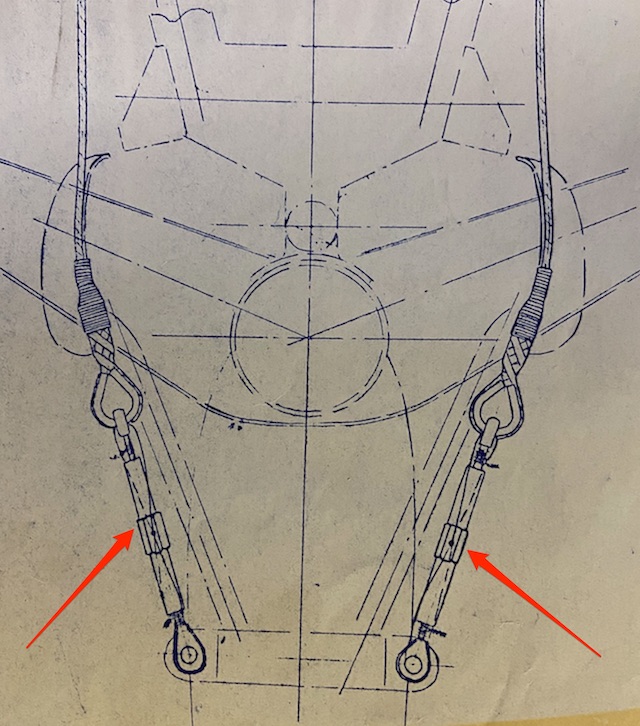
If you know of a source for these unusually small turrnbuckles would you please let me know and I will pass the information on?
- Written by: Administrator
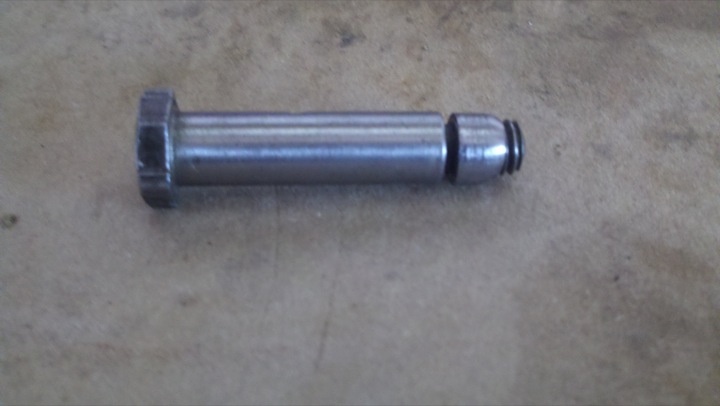
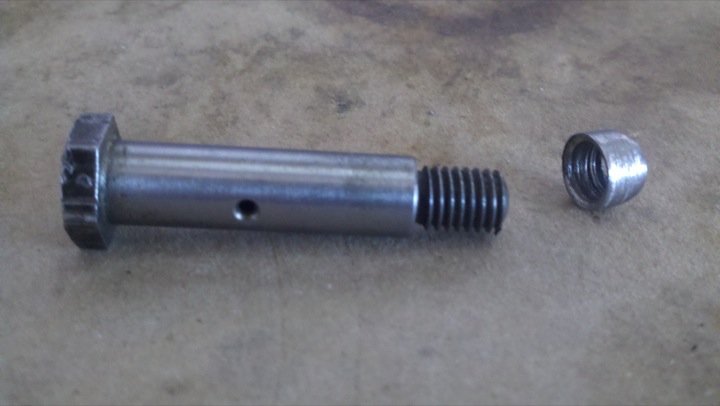
It started out as a plain American 7/16" nut. Tapped to 8 mm. Threaded on the bolt and machined down on the lathe to the bolt diameter. A slight taper and the shoulder bolt goes in much easier.
Great idea. Thanks Doedo!

